Archive for the 'sweets' Category

sugar snack

Remember my friend Kris? The one who brought a plate of sprouts as a hostess gift? Which subsequently turned me into a sprouting fool? Well she’s also the woman who nudged me into beekeeping. It’s a hobby I’d flirted with, but until what I’m pretty sure amounted to Kris rigging a holiday gift swap so that a copy of Sue Hubbell’s A Book of Bees: and How to Keep Them ended up in my hands, I wasn’t really ready to jump in. As romantic as it sounded, I think there was something about boxes of stinging insects that gave me the heebie-jeebies.

But guess what? I finished Hubbell’s book and I knew, almost certainly, that I wanted bees. Or at least I wanted a hive that I could sit and have a sandwich with. My heebie-jeebies were gone. Well, mostly gone. Gone enough for me to register for a two-day crash course in beekeeping at the University of Minnesota. Forty-eight hours with Dr. Marla Spivak (a renowned bee researcher) and her sidekick Gary Rueter put me over the edge.

winter beekeeping

I came home, fumbled my way through building hive boxes and wrangling delicate wax sheets into wooden frames. Not really a hard job, but one with a bit of a learning curve for sure. Later that spring, I got a somewhat terse call from my local post office. It was 7:00 a.m. and they wanted me to know that three pounds of bees were waiting for me. Outside. In the back alley.

I love that you can still order bees and chickens through the mail. It feels very pony express-like. Which, in a way, it sort of is. Most bees packages come via truck from apiaries in California. It seems like an arduous journey. The queen gets a luxury sweet, tucked into her own private little mesh cage with a few worker attendants to accompany her. The rest of the bees are stuffed into shoebox size, wood and wire box surrounding the queen. There are always a handful of unlucky bees who don’t get sealed inside. Amazingly, most of them manage to make the 2000+ mile journey clinging precariously to the outside.

It is, of course, best if you can install the weary travelers into their new home as soon as possible. From the few times I’ve ordered bee packages though, I’ve learned that the arrival of bees almost always triggers a major weather event—typically a blizzard. So if need be, they can spend another few days tucked inside somewhere. A few spritzes of sugar water through their wire mesh is all they need.

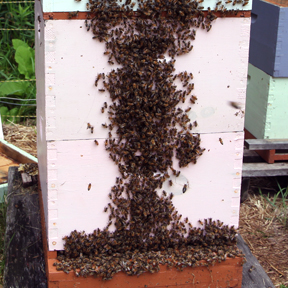
Getting the bees situated is a pretty painless job. At this point in the game, they’ve got nothing to protect and are simply looking for a place to set up shop, which means they’re mild mannered. All that’s required is to pry open their wooden top, remove the mini-queen cage (tucking her safely in a warm pocket is a good idea) and give the box of bees a good upsidedown whack into an empty hive box. The bees (about 12,000 of them) literally just pour out. I remember Gary from bee class instructing to use the hive tool (a mini crowbar-type tool) to spread them around, “just like pizza sauce.” Which is of course what I now visualize every time I spread pizza sauce. Thanks Gary.

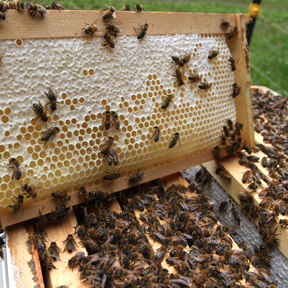
Frames of foundation—containing the same delicate wax sheets you toiled over weeks ago—are added to the hive, and the queen gets nestled in last. Then it’s best to shut up the hive and let them acclimate to their new surroundings. If the weather cooperates, they’ll be out flying and getting down to business within a day.

bee-treats

I’ve been lucky. I’m going into my tenth year of beekeeping and I’ve only had to buy a handful of packages. My overwintering success has been good, allowing me to split and divide them to make new hives as they grow. But I almost always have to nurse my bees along a bit in the spring.

After a few months of well deserved rest, the queen—miraculously perceiving a change in season—resumes laying eggs in February. This means by March there is a growing number of baby bee mouths to feed. And where I live, the first dandelion doesn’t typically bloom until well into April. Sometimes even May. So if the hive is low on stored honey, they can starve to death, right when things are beginning to look hopeful.

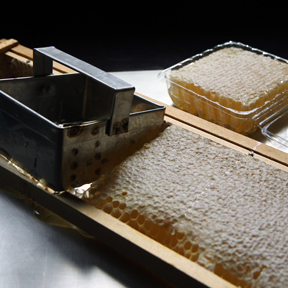
I bring any hive that seems like they need it a homemade sugar snack to get them over the hump until the nectar is flowing naturally. Their treat is a simple boiled sugar mixture that, in candy making speak, has reached the soft-ball stage. What results is a nice, moist, pliable sheet of bee candy. I also slip my hives a “pollen patty”—a substance that mimics the protein structure of real pollen–which the bees use to rear their young.

So even though spring officially arrives on scene today, I was in the kitchen making sugary, glossy bee treats. And since I was already there with an apron on, I also whipped up a small batch of honey shortbread cookies. After all, I’m going to need something to accompany that first sandwich of the season out at the hives, right? Happy spring friends!

honey pecan shortbread

Honey Lavender Pecan Cookies

The lavender is optional, but I was feeling particularly springy, and it seemed like it would be a nice floral addition. It was. Like most shortbread, these are not overly sweet and are great for dunking.

1 1/2 ounces (or roughly 1/3 cup pecans) 3/4 teaspoon culinary lavender flowers (optional) 4 ounces (1/2 cup) unsalted butter 6 ounces (or roughly half of 1/3 cup of honey) 1/2 teaspoon vanilla 1 cup flour 1/2 teaspoon kosher salt 1 tablespoon honey for glaze

Toast the pecans on a cookie sheet in a 325º Foven for 8-10 minutes. Let cool and pulse them in a food processor with the lavender flowers until they are ground up, but still a little coarse.

In a mixing bowl, beat the butter, honey and vanilla until light and fluffy, about 3 minutes. Add in ground nuts, flour and salt, and mix until just combines and the dough starts to come together in a ball. Turn out onto a piece of parchment, wrap, and chill for an hour or two. (You could easily pack a picnic lunch while your dough chills, just saying.)

Let dough come to room temperature for a few minute before forming into roughly 1-inch balls. Flatten with a flat bottom glass dipped in flour.

Bake about 18-20 minutes in a 325ºF oven until lightly browned. Remove from oven and while cookies are still warm, brush their tops with honey. Makes about 15 cookies. Recipe doubles easily.

cry uncle

I’m one of those people who genuinely struggles with winter. I like winter, and somehow I’ve managed to tackle 43 of them, but not without effort. I have all the prerequisite gear: sorels, skis, mukluks, snowshoes, down parka, yaktrax, thick woolly socks, a pom-pom hat, you name it.

But I also have Raynaud’s. Which means my blood vessels are prone to spasm. Spasms that cut off circulation to my fingers, toes, nose, ears, and yes, even my butt cheeks. More often than not, these extremities are in some crazy shade of blue or white and are pretty much numb. It can be a real buzz kill.

Still, I try. This year more than ever, I’ve made it a point to embrace the cold. When we got our first blizzard in early November, I took it as an opportunity to expand our snowshoe trails. When the thermometer got stuck below zero in December, I just quit looking and went outside anyway. And when we were dealt a long string of grey days in January, I donned my pom-pom hat and remained cheerful.

lemons

But this week? This week it’s all over. Winter has officially pinned me down and made me cry uncle.

It’s my own fault. I made a tactical error of spending a long weekend in California. California, where it was bright, and sunny, and warm. It only bothered me a teeny tiny bit that they are struggling through their worst drought ever and I was visiting in what should be the rainy season. Plus one for climate change. I came home with a stiff neck for how much time my face spent involuntarily craned towards the sun.

But I can’t pin my winter resignation solely on the sunny weather. The company had a hand in it too. Allow me to do the math. Five lifelong friends renting a beach house + 4 bright, sunny, warm days in an otherwise cold grey stretch = nothing can compare, so don’t even bother trying, and good luck getting on with the rest of winter. Sigh.

I spent my teenage summers with these four women, but we weren’t doing typical girly stuff. Instead, we were backpacking through the mountains via Camp Widjiwagan. Together we traversed the Bighorns in Wyoming, the Beartoooths in Montana, then northward to the Canadian Rockies, and finally, a six week trip (complete with 2 air food drops) to Kluane National Park in the Yukon.

Let me tell you when you spend 43 nights together in a tent, you get to know each other pretty much inside and out. And when you do things like break camp in the early pre-dawn to forge a stream that’s too raging to cross during the day because of glacial melt, certain sort of trust emerges.

kluane-circa1989

I guess there is an inexplicable bond that forms when you make the choice to drop off the map together, into the wild with only yourselves to rely on. That’s the only way I can account for the five of us, living all across the country, leading very different lives, still being able to come together and instantly join at the hip.

What a relief it is to have people like this. You can check your back story at the door because they already know it by heart. These are the friends who you’ll stay up late with, spilling wine on your jammies. The ones you’ll stumble down to the beach with, hot coffee in hand, for some morning yoga. The ones whose job it is to restore you. The ones who will make you feel 18 and invincible.

Can you see how winter got the upper hand?

I arrived back in the land of cold and perpetual grey with a few bright reminders tucked in my carry on. Citrus from my friend Cari’s lemon and lime trees. I set my gems on the counter and fixated on them all week long. I grew overly attached. In the end, I more or less had to force myself to use them. I just couldn’t bear to relinquish their bright, sunny energy. Finally, reason kicked in and I understood that watching them gradually rot would be worse.

little-lemony-loaf

Which is how I wound up with three lovely little lemon loafs sitting on the counter instead. Not a bad trade-off. Because now, instead of putting on an extra layer to go out, I can just stay in and have another slice of encouragement. Uncle.

Lemon Cake
(adapted from Rose Carrarini’s Breakfast Lunch Tea)

This is a subtle, unobtrusive lemon cake, laced with almond flour. And like the book it originates from, it is absolutely perfect for breakfast, lunch, and tea.

1 cup butter, room temperature
1 cup sugar
4 eggs
1 teaspoon vanilla
juice and zest of 2 average size lemons
1 rounded teaspoon baking powder
1/2 teaspoon salt
1/3 cup plus 1 tablespoon almond flour
1 3/4 cups all-purpose flour

For the glaze:
juice of 1 lemon or lime
1 1/4 cups powdered sugar

Beat butter and sugar until light and creamy. Add eggs in, one at a time, beating well after each. Add vanilla, lemon juice, and zest. In a separate bowl, mix dry ingredients together with a whisk and gently fold into the batter.

Pour batter into a well buttered pan (1 loaf, 3 smaller loafs, an 8-inch – whatever strikes you) and bake about 35 minutes. Your choice in pans might affect baking time, so watch closely towards the end and don’t over bake, leaving you with dry cake! Top should be golden and a toothpick should come out clean.

Let cool, remove from pan, and drench with the glaze (which is simply well combine lemon (or lime) juice and powdered sugar).

disected lemons

walking italy

My slide into the new year has been a good one. After successfully completing two family visits, I arrived home just past midnight on Christmas, threw the car keys into a drawer, and left them there until January 5th. An introvert’s dream come true.

I got straight to work on a 1,000 piece jigsaw puzzle of Mary Poppins floating gracefully above the London skyline. And I ate. A lot. I followed up our traditional Christmas fondue and Swiss raclette with my favorite bean stew. I made smashed avocado and eggs topped with my favorite Rio Fuego hot sauce, and my friend Kris introduced me to a new Italian sweet – potica, a simple walnut bread that blew my tastebuds several mornings in a row.

breakfast

I broiled grapefruit with cardamom sugar and ate as much fresh pineapple as my unacclimated, northern mouth could possibly handle. There were black bean-poblano-mushroom enchiladas, plump artichokes dipped in lemon butter, and copious amounts of spicy caramelized peanuts. To fully celebrate citrus season, I made mini key lime tarts and polished off a case of clementines.  A neighbor dropped by a loaf of homemade raisin-nut bread that made a week’s worth of remarkable toast. And I tested out my brand new “kladdkaka” pan with a Swedish chocolate sticky cake.

To compensate for this gluttony, I snowshoed. A lot. An excessive amount, really.

trail

I should explain. Back in July, I received a seemingly benign Fitbit for my birthday. Which is really nothing more than a trumped up pedometer. And I admit, when I first heard of the Fitbit, I scoffed. Have we really become that sedentary that we need to track our steps?! What is wrong with us?! The well intentioned folks at Fitbit suggest that walking 10,000 steps a day is a reasonable, healthy fitness goal. Again, I scoffed. No problem. I’m active. Bring it on, Fitbit.

Oh how naive I was. It was a blow to discover that taking Earl for a quick morning spin, parking my car a decent distance from my office door, going up and down a flight of stairs a handful of times to use the restroom, walking across campus for lunch and maybe once or twice more for a meeting, then taking Earl for a quick evening spin yielded roughly 4,000 steps. Not even half of the recommended goal. That’s when I got serious. I am now a full-blown, self-acknowledged, Fitbit fool. 

Midway though my eleven day puzzle, eat, snowshoe stint, I received a note from Fitbit congratulating me on earning my Italy badge. Which means that since owning my Fitbit,  I have walked 736 miles – the entire length of Italy. Our snow came early this year, wreaking havoc on my walking route. I was in despair for a full week until my clever husband pulled our snowshoes out of the shed. I figure almost a third of my journey has has been via snowshoe. Which is a heck of a way to see Italy!

Happy 2015 friends. Here’s to many great steps…

kladdkaka

Swedish Chocolate Sticky Cake

Until my mother – lover of all things cookware – gave me a kladdkaka pan, I’d never heard of one. But the pan came with a recipe for chocolate sticky cake tucked inside, which I think has become my new go-to brownie recipe. The edges are chewy and the interior is perfectly, well, sticky. You could easily make this in an 8-inch too – though you’d be missing out on the handsome fluted edges. (plus, “kladdkaka” is just fun to say.) It’s an intense, sweet cake that goes lovely with a shot of espresso at about two in the afternoon.

1/2 cup butter at room temperature
1 1/3 cups white sugar
1 teaspoon vanilla extract
1/4 cup unsweetened cocoa powder
1 pinch salt
2 eggs
1/2 cup all-purpose flour
handful of cocoa nibs (optional)

Beat butter, sugar, vanilla, cocoa, and salt together. Mix in eggs and blend well. Stir in flour and optional cocoa nibs until just combined.

Pour batter into greased kladdkaka or 8-inch pan. Bake on the lower rack of a 350º F oven for 25-30 minutes*, until center is just set.

Let cool for 15-20 minutes. Run a knife or spatual around edges to loosen. Hold a plate in place over the pan and invert to release cake.

*This will yeild a slightly oozy cake that can be served as is, or with whipped cream or vanilla bean ice cream. For a slightly firmer, more brownie-like texture, bake the cake a bit longer until the center is mostly set.

2:00 snacky

chill meter

Sha-wing! Did you hear that? That was August. My dear, sweet August, flying by. I could live in August forever. A bottomless supply of tomato sandwiches, cat naps in the the corn patch, icy fruit popsicles, sweet peas gracing my windowsill, and a stack of beach reads. What else is there, really?

sweet-pea

If I play my cards right (I did), August also means a highly anticipated trip to the Minnesota State Fair. I grew up with the fair and I’m sort of a nut about it. Which is amusing. Because crowds, fried food on a stick, and highly stimulating situations generally make me run. But you’d never guess it, to see the way my faces lights up crossing over the Como Avenue skywalk into the fairgrounds. All bets are off, I tell you.

And without fail, August also brings a canoe trip to the Boundary Waters. My number one rule about the Boundary Waters is this: always go. No matter how busy, stressed, or complicated life may be, always go. I actually wrote this rule down in a notebook seven years ago and it seems to have stuck. Some trips aren’t as long as I’d like, but still, it’s time in the wild. This year, though, we landed a full 7 days. Heaven.

This didn’t, however, keep me from racing around like a fool before the trip. Business to take care of, food to prep, camping gear to mend, and house sitter details to work out. My desk was littered with “to-do” notes. At the height of the pre-trip hubbub I mentioned in an e-mail to my friend Gail that I needed to “figure out the chaos of my life” and that with any luck I’d “have an epiphany” on the trip. She sent me back a one line response: “or not, spontaneous epiphanies are good…laborious epiphanies not so much and they might interfere with your chill.”

My chill? Epiphanies be dammed. Nothing was going to stand in the way of my chill. Nothing. I should mention that Gail is, quite possibly, my wisest and most inspirational friend. Her advice is typically worth heeding.

boundary waters chill

It was a top-ten, five star trip. We hit the peak of wild blueberry season, ran into remarkably few people, and had a turtle count in the double digits. Cool nights let me burry deep into my down sleeping bag and afternoons warmed up enough to play multiple rounds of “lizard basking on hot granite” (one of my very favorite pastimes).

I discovered author Ruth Rendell and had Chief Inspector Reginald Wexford to keep me company on the trail. Nothing like a good old-fashioned English whodunit to nod off to sleep with. Rendell gave my vocabulary a run for its money. Words like bedizened (dressed up or decorated gaudily) and anathema (something or someone that one vehemently dislikes) left me begging for a pocket dictionary. And I came away with a new favorite expression: “needs must when the devil drives.”

I worked hard, slept even harder, and ate well. I delighted in the fact that, as always while camping, my life was brimming with mindfulness. Every step on the portage trail was a step to be considered and noticed. I always knew right where my pocket knife and lip balm were. Meals were efficient, simple, and satiating. My greatest anticipation was our daily “after-chores” swim. There was no clutter, no wasted energy, no laborious thought. My chill meter was pegged, baby.

There is nothing in my world that beats a week in the woods. I come back glowing and super-charged every time. Still, it’s good to come back. Back to the shores of Lake Superior. Back to the corn patch. Back to my chaotic life. Back to September, where there is still plenty of time to enjoy an icy fruit pop. And maybe, just maybe, back to a spontaneous epiphany. Happy summer.

icy pop

Tart Cherry Icy Lime Pops

1 1/2 cups fresh or frozen tart cherries (to make a healthy 1 cup of puree)
1/2 cup greek honey yogurt (or 1/2 cup plain greek yogurt with 1-2 tablespoons honey stirred in)
2 teaspoons fresh lime juice
1/3 cup sugar + 1/3 cup water for a simple syrup

Simmer the sugar and water together, stirring until the sugar is dissolved. Chill this mixture in the freezer while you prep the rest of the pops.

Blitz the cherries in a food processor to make a generous cup of puree. Add more fruit if necessary. I like mine pureed pretty finely, but you can leave the mixture chunkier if you prefer a bit of texture. Combine puree with the rest of the ingredients, ideally in a large pourable measuring cup. Stir in the chilled simple syrup and whisk to blend.  Pour the mixture into popsicle molds, or, in a pinch, dixie cups. Insert sticks and freeze at least 8 hours or overnight. Makes about 5-6 popsicles, depending on the size of the mold.

* You can, of course, substitute different fruits. Just vary the amount of sweetness to suit your tastes. Some fruits may pair better with lemon too. The simple syrup gives texture to the pops and keeps them from turning too icy.

cherry-puree

toing and froing

Whooboy. I’m in transition. Really, I’d like to hope I’m on the backside of transition. November brought an opportunity to work on a more permanent basis with one of my long time design clients. So I’ve been busy juggling freelance work while also settling into a new life in the marketing department at Northland College. It’s great, I love it, change is inspiring. I’m just a lousy juggler.

juldough

I knew going in that this year’s holiday baking regimen might be compromised. Realizing I had a limited amount of time in the kitchen, I thought long and hard about what would fill my holiday tins. My week 52 toffee for sure – it was the first (and last) thing I made. Another no brainer was a few batches of the Smitten Kitchen’s spicy brittled peanuts. And I painstakingly narrowed it down to just one cookie recipe. Great Aunt Mable’s recipe was a top contender, but in the end, I settled on a simple Swedish rye cookie – another nod to Grandma Myrtle and my Scandinavian roots.

I’ve been fussing with a rye cookie recipe that came attached to a Julebock cookie cutter I bought years ago. The Julbock is the popular Scandinavian Christmas goat – you know the one – usually made of straw and tied up with a red ribbon. In the playful spirit of the goat, “julbocking” is a Scandinavian tradition that involves going from house to house to make mischief and merriment. I didn’t grow up julbocking, but I did grow up with a red wooden goat, handmade by Grandpa Orville. It was, and remains, my favorite Christmas decoration. As a kid I think I was drawn to the shiny red paint. But as an adult, I relish the symbolism of playfulness and joy. It’s too easy to lose that in all the hoo-ha.

julbock

Which is precisely why I decided to mix up a batch of jolly Julebock rye cookies. They would be the perfect antidote to this extra helping of chaos I’ve been indulging in lately. All month I moved my marked up recipe card around the kitchen as a prompt to fire up the mixer. From the counter, into a cookbook to mark a page, inside the mixing bowl itself, and back into another book. Herein lies the problem. In all my toing and froing, I lost the recipe. At least three times I spent what should have been precious baking time ransacking the kitchen for the recipe. Did I mention I’m a lousy juggler?

The recipe eventually unearthed itself, a few days after Christmas, from a pile of neglected paperwork in my office. Better late than never when joyfulness is on the line. I galloped straight into the kitchen, put on some Johnny Cash, and got out my rolling pin. I love this cookie. It’s complex, and not too sweet – which means it isn’t for everyone. But for me, it means not being able to keep my hand out of the tin. It’s also a perfect afternoon tea cookie. And, as with all cut-out cookies, don’t limit them to the Christmas season. Think valentine hearts, four leaf clovers, flying witches, and showy turkeys.

Swedish Rye Cookies

I’ve made this recipe a handful of times, altering here and there as I go, and I’m finally 100% satisfied. The biggest change I made is to swap in honey for white sugar. If you’d rather use sugar, omit the honey and use 1/2 cup sugar. The dough might seem a little sticky after chilling, but it is very forgiving. Just don’t be shy about rolling it out on a well floured surface. It makes all the difference. Feel free to play with spice combinations as well.

3/4 cup butter
1/3 cup honey
1 large egg
1 1/3 cups rye flour
2/3 cups white flour
1 teaspoon ginger powder
1/2 teaspoon ground cardamom
3/4 teaspoon kosher salt
2 teaspoons baking powder

Cream the butter and honey together. Add in egg and blend well. Mix together dry ingredients in a separate bowl and slowly add to the butter mixture. Mix thoroughly. Form the dough into two flat rounds and chill for at least an hour, or overnight. Roll out the dough rounds on a well floured surface to about 1/8 inch thick. Cut out cookies and transfer them to baking sheet with thin spatula (you can re-chill and re-roll the scraps once – more than that and they run the risk of getting too floury). Bake at 350º F, 5-6 minutes for smaller cookies, 8-10 minutes for larger shapes. Watch carefully – they brown quickly! (Makes about 6 dozen, smaller 2″ cookies)

joy

bee bundle

I’ll be the first to admit that I have a recipe problem. I love recipes. I can read a cookbook like a novel. I’m not capable of paging through a cooking magazine without tearing out at least a handful of pages. And frequently when I’m asked to dinner, I’ll inevitably wind up in the host’s kitchen, asking for a pen to copy down some recipe I’ve discovered in their cookbook collection. There are worse addictions, I tell myself.

Needless to say, I have no shortage of recipes. It’ll be a miracle if I ever manage to cook my way through my stash. Of course that would require that I stop adding to it. Which isn’t likely. It’s such a thrill to stumble on combination of flavors I hadn’t thought of, or to find some fun magazine spread that instantly makes me want to throw a dinner party. But nothing compares to getting a recipe in the mail. Because it means that someone thought a particular recipe might resonate with me and come to life in my kitchen. I love that.

kitchen clips

I have a bulging folder of recipes to try – all waiting to see if they’ll make the cut and be taped into my permanent collection. But I keep a separate, slimmer file, of recipes that people have sent me. This is my favorite file to delve into. I tend to wait for more special occasions to try these recipes.

Which is what happened this weekend with a recipe that someone (thank you Pernille!) sent me months ago. I’ve been thinking of this treat, off and on, waiting for just the right time to try it. The recipe is for a simple, honey-based Italian budino (pudding). And right away, a sentence in the description caught my attention: “This is a sweet to enjoy straight, unembellished, the way you might a complex single-malt Scotch.” The idea being that flavor of the honey, be it a mild clover or an earthy buckwheat, will really shine through. That’s my kind of dessert.

bee-box

For me, late fall is the most melancholic time as a beekeeper. Its the time of year when I tuck in my hives, batten down the hatches, and wrap them up in black insulation – hopefully creating a bee bundle that will survive the long winter. I peek under each hive’s inner cover one last time, knowing we won’t see each other for almost 5 months. I’ll check in on them during the winter, but I won’t open up the hives again until the first March thaw. So my final trip to the fall bee yard is always a quiet one.

But this year, I knew just the thing to lift my spirits. Honey Budino. My friend Julie was hosting a dinner and I offered to bring dessert. It was the perfect ending to a lovely fall meal. Making  this luscious honey pudding was also a nod of gratitude to my bees. Something to make our parting a little sweeter.

Like most puddings, this one is not without its fair share of cream and eggs. I take comfort knowing it is spread over 8 servings. And the indulgence is worth it. This one gets taped in the book. My budino took a little bit longer to set than the recipe suggests, but I thinks it’s because I also had a tray of pumpkin seed brittle in at the same time. It’s hard to beat autumn in the kitchen. Enjoy!

budino

Honey Budino
From The Wall Street Journal
Aleksandra Crapanzano / Karen DeMasco

1 cup honey
1 quart heavy cream
1 teaspoon vanilla extract
3/4 teaspoon kosher salt
1 large egg
7 large egg yolks
1/4 cup plus 2 tablespoons dark brown sugar

In a medium-size saucepan cook honey until it darkens and just begins to smoke. Remove pan from heat and slowly add cream, whisking continually. Set aside.

In a separate bowl, whisk together vanilla, salt, egg, yolks and dark brown sugar. Temper yolk mixture by whisking in about a cup of the hot cream and honey mixture. Scrape yolk mixture into cream mixture and whisk until well combined. Strain through a fine-mesh sieve.

Divide pudding among eight 6-ounce ramekins. Place filled ramekins in a deep baking dish or roasting pan, spaced evenly. Add enough hot water to pan to reach halfway up sides of ramekins. Cover pan with foil and place on center rack of a 275º oven. Bake 15 minutes, then rotate pan, lift foil to release steam and replace foil securely. Continue baking, rotating and releasing steam every 15 minutes, until budinos are completely set around edges and slightly loose in centers, about 45 minutes total.

Remove foil and set pan on a rack to cool. When budinos are cool, remove them from water and refrigerate, uncovered, until completely chilled. Budinos can be stored, loosely covered, in refrigerator up to 2 days. Serve as-is, unadorned to let the honey take center stage.

october potential

Ouch. Normally October and I are fast friends. But this particular October has been something to recon with. This October took me in, chewed me up, and recently spit me out into a deluge of grey snow flurries. I’ll spare you the details, but do you want to know just how cruel October has been? I haven’t even planted my garlic crop yet. Terrible, I know. But that’s the beauty of garlic. It’s very forgiving.

October was at least kind enough to afford me a teeny bit of time in the kitchen. And there were some memorable moments to be sure. We had a surplus of fresh pressed apple cider this year, so I liberally took 2 gallons and slowly simmered it down to make 4 half-pints of an amazing boiled cider. It sounds extravagant, I know, to turn 2 gallons into 4 cups, but the result is worth it. The cider cooks until it turns into a thick, sweet-tangy syrup – somewhere between the consistency of maple syrup and molasses. I can’t decide how to use it first – spooned onto a cheese plate, glazed over roasted carrots or squash, mixed into a vinaigrette, or simply drizzled over vanilla ice cream. I’ll keep you posted on that as the winter wears on.

cider flow

Making boiled cider is really as easy as putting fresh cider in a heavy stock pot, bringing it to a boil, and then reducing the heat so it can simmer 4 – 5 hours. You really only need to give it an occasional stir until about the last 30 minutes. When it starts to thicken up, you want to stir more often to keep it from scorching. Remove it from the heat when the syrup gets to a consistency you like. That’s it – boiled cider. I went a step further and filled sterile jars and gave them a 15 minute hot-water boiling bath. But, like most concentrated sugars, this will keep almost indefinitely in the fridge, even without canning.

Then there was the night Mark came home with his sweatshirt bundled up and overflowing with fresh purple plums. We sucked down plenty of them fresh, but the stragglers got turned into a simple butter cake. My favorite fall cake – equally as good with pears, plums, or apples. And equally good, if not better, with coffee the next morning. That’s my kind of cake.

plums-in-a-pan

The other great thing about this cake is how fast and easy it is. Grease an 8×8 pan with butter and fill the bottom with fresh cut fruit. Melt 9 tablespoons of butter (it is a butter cake after all) and set aside. Mix 5 1/4 ounce (3/4 cup) sugar with 2 eggs. Add in 2 1/2 ounces flour (scant 1/2 cup) and 1 1/2 teaspoon baking powder. Stir in the melted butter and pour batter over fruit. Dust with a bit of nutmeg, cinnamon, or ginger if desired. Bake at 350º F for 40-50 minutes until cake is golden and crackly. See how much potential October has?

But I think the standout for the month was a garlic soup from Yotam Ottolenghi’s Plenty. The soup itself was simple, yet deceivingly rich and packed with deep flavor. But what really knocked it out of the park was the harissa garnish. It gives the soup just the right punch. For an even quicker meal you could sub in store bought harissa, but I wouldn’t recommend it. Yottam’s version is in the running for the finest harissa I have tasted. It’s well worth the extra 15-20 minutes of effort to mix it up fresh. It didn’t take me long to use up the leftovers – spooning it onto eggs, avocado toasts, and even a green arugula based pizza.

We had the soup as a meal with a big fall salad and sourdough for dunking, but I think it would make a particularly lovely first course for a dinner party. Twenty-five cloves of garlic may seem like a lot of work, but it’s really not too bad, especially if you don’t go and use teeny tiny cloves like I did and subsequently have to double the amount to 50. Careful use of a mandolin can make fast work of slicing perfectly thin garlic. As far as the stock and wine go, don’t skimp on quality – they really make up the flavor base of the soup. And the harissa! The harissa will become a kitchen staple for me, soup or no soup. It’s a tad on the salty side – which is one of the reasons why I fell in love with it, but if you’re leery of salt, start small and taste as you go.

toasty

Well there. I feel better for having gotten October off my chest. Hopefully next year we’ll resume our slow-paced, nostalgia filled relationship.

Garlic Soup with Harissa
From Yotam Ottolenghi’s Plenty

For the harissa

1 red pepper (or 3 small)
1/2 tsp each coriander seeds, cumin seeds and caraway seeds
1/2 tbsp olive oil
1 red onion, peeled and chopped
3 garlic cloves, peeled and chopped
2 red chillies, seeded and chopped
1/2 tbsp tomato purée (or tomato paste)
2 tbsp lemon juice
2-3 tsp coarse sea salt

For the soup

3 T butter
2 T olive oil
4 medium shallots, finely chopped
3 celery sticks, finely diced
25 garlic cloves, finely sliced
2 tsp chopped fresh ginger
1 tsp fresh thyme, finely chopped
1/2 tsp coarse sea salt
3/4 c white wine
1 generous pinch saffron strands
4 bay leaves
1 quart good-quality vegetable stock
4 tbsp parsley, roughly chopped
Fresh cilantro, roughly chopped
Greek yogurt or Crème fraîche (optional)

First make the harissa: put the pepper under a very hot oven broiler until blackened (10-20 minutes, depending on your broiler). Transfer to a bowl, cover with plastic wrap, leave to cool, then peel and discard the skin and seeds. While the pepper is roasting, place a dry frying pan on a low heat and toast the coriander, cumin and caraway for two minutes. Transfer to a mortar and grind to a powder. Heat the oil in a frying pan and fry the onion, garlic and chillies over medium heat until dark and smoky – six to eight minutes. Then blitz all the paste ingredients together in a food processor.

For the soup, gently fry shallots and celery until soft and translucent (about 10 minutes). Add the garlic and cook for five minutes more. Stir in ginger and thyme, add salt, pour in the wine and leave to bubble for a few minutes. Add the saffron, bay leaves and stock, and simmer for 10 minutes. Remove the bay leaves, add the parsley and blitz with a hand-held blender. Do not over-process – keep some texture.

Serve in shallow bowls. Swirl in some harissa, sprinkle over coriander and serve with a dollop of Greek yogurt or Crème fraîche, if you like.

garlic-soup

sweet perk

September is looking up. Not only is it National Yoga month, it’s also National Honey month. Hard to go wrong with either one in my book. Oddly enough, they generally go hand in hand for me. My back typically needs a dose of yoga after slinging around fifty pound boxes of bees and honey. Beekeeping is a weird balance between delicate finesse and sheer brawn.

Overall it was a pretty quiet summer in the bee yard. Nothing compared to last summer’s drama. Since I started the season with two young hives, my main goal was to grow each hive from one box of bees into three so they will be ready for a long Wisconsin winter. Things got off to a painfully slow start. Cold weather kept the bees a solid month behind schedule. I conceded early on that there would not be much of a honey harvest this year. Leaving it instead for the bees’ winter supply.

full-house

I got my new bees from my good friend Kris at Wild Girl Farm, but the queens came form neighboring apiaries in northern California. Queen Hallie Frances has a two week head start on Queen EB and it showed all summer long. Hallie’s hive hit a population boom at just the right time. When the Basswood stared blooming, she had a fleet of foragers ready to go in full force. They started packing so much nectar into their hive, it caused me to reconsider my decision not to pull any honey off.

This was in July, and Hallie Fances’s girls were just outgrowing their second box. I needed to decided quickly if I wanted to add their third hive box, or put on a honey super instead. I did a mental flip through the calendar, calculating how much time they would have to fill a third hive box if I interrupted things with a honey super. And then there was the question of what kind of honey super. I could give them drawn out comb that would later be run through the honey extractor, or I could put on some thin sheets of beeswax, letting them draw it out and make cut comb honey instead – a riskier and slightly more intensive undertaking.

I say “riskier” because in my experience, having bees successfully produce comb honey takes a certain sort of hive. They have to be strong, willing, and ready. And the hive needs to be managed in such a way that they have just barely enough room. Not so cramped that they’ll want to swarm, but tight enough so they don’t get all willy-nilly about their cut comb project. Some hives have what it takes and some hives don’t. Enough failures and successes have taught me to spot good candidates.

I love honey in any form – raw, baked into things, creamed – but pure comb honey is my favorite. The comb is imbibed with enzymes, traces of pollen, and subtle floral essences, all providing an extra richness and depth of flavor. And it adds a versatility that bottled honey lacks. You can slice it, crumble it, spread it, and above all – chew on it. Back in the old days cut comb was the honey product of choice. In fact there is even a historical “comb honey” era on the books from about 1880 to 1915. There were no Pure Food and Drug Laws in the U.S. until 1906 – which meant that a lot of bottled honey was spiked with corn syrup, which also meant a lot of consumers avoided it, opting instead for pure cut comb. No filler added.

honey comb

I sat down to consider my options, watching the rush hour traffic come and go from Hallie Frances’s hive. The girls were practically radiating determination. And that did it. I decided to hedge my bets and go for the gold. I got up and went for the cut comb super I had waiting in the car.

And sure enough, they took to their cut comb duty head-on, drawing it out, packing it full, and capping it over – all before the Basswood flow even finished. Rockstars. I slipped the comb super off and replaced it with their third hive box before I left on our annual Boundary Waters canoe trip. And now their third box is nearly packed full, ready for winter.

Queen EB never quite caught up with her roaring neighbor, but her girl’s held their own. They are just shy of 3 boxes, and will most likely spend the winter in 2 deep and 1 shallow box, which should do the trick. But the best part about both hives is their chill attitude and sunny disposition. When I slide their inner covers off, they generally buzz up, like old friends, glad to see me. One of the sweet perks of keeping bees.

cut-comb

Eating Cut Comb Honey

As-is: cut off a chunk and chew on it. It’s great for a simple after dinner sweet, or if you need a mid-day energy boost. After the honey is gone, the wax will turn into an almost everlasting piece of gum that you can chew and spit out whenever. If you chew long enough, it will slowly start to dissolve. Some people advocate it’s quite good for you.

Thinly sliced: use a pairing knife to cut thin slices. Add to cheese and fruit plates plates. Blue cheese on a thin cracker topped with honeycomb is excellent. As is a crisp pear slice with ricotta and honeycomb. Cheddar, fresh jalepeño slice and sliver of comb honey is another winner. Manchego and Granny Smith? The possibilities are endless here people!

Spooned/Crumbled: over hot cereal with a dab of butter. Fall mornings never looked so good.

Spread: onto warm buttered toast. The comb and honey will melt into deliciousness all over your toast.

goodness-sake comb honey box

jilted

The third time’s a charm, right? Let’s hope so. Last week I underwent my third eye surgery in as many years. And with any luck, it will be the last – at least for a while anyway. If nothing else, I’ve got the surgery drill down pat. I’ve learned the crucial necessity of power hydrating the night before. I know that it is pointless to lug a book around – even though there will be hours of waiting. And I’ve learned to anticipate the eerie feeling of slowly coming back to reality mid-way through surgery. All of my surgeries have been at the University of Minnesota, which is, of course, a teaching hospital. So to wake up and realize you’re listening to a play by play of what’s happening to your eye can be a little unsettling.

But mostly what I’ve come to appreciate is the recovery room. It’s such a nice feeling to land and become increasingly re-grounded in the world. Like magic, my husband Mark materializes in front of me with a reassuring smile on his face. That’s when I know we’re really getting to the good part. They’ll ask what I’d like to drink and without hesitation, I’ll choose the apple juice. My juice will almost assuredly be accompanied by a package of Lorna Doone shortbread cookies. And I will methodically indulge in this snack like I were in the finest of restaurants enjoying an absolutely memorable meal.

lorna-doone

So I was taken aback this time around when the recovery nurse asked me what color popsicle I wanted. Popsicle? I hadn’t thought about popsicles. “Green? Orange?” I answered with uncertainty. She arrived back and handed over a paper cup with a half-opened popsicle perched inside. It was purple. I ate half and gave the rest to Mark. It was okay. But it wasn’t apple juice and Lorna Doones.

I forgave my nurse this oversight, but I have to admit that I started to lose a little faith in her as she was reviewing my post-operative care directive. She recited the orders verbatim, Mark following diligently along with his own copy. When we got to the part about putting a hot compress on my eye, it included a little tip. An easy way to do this, read the instructions, is to microwave a sock full of rice. To feel like I was contributing something to this process, I piped up from my bed that we don’t have a microwave. The nurse looked up and said, “Well whatever you do, don’t use the oven. I tried to dry a pair of jeans that way and they burnt right up.” Wow.

I pondered this as she resumed reading. I can’t imaging stuffing a pair of jeans in my oven. I mean, what rack would you put them on? But what I really can’t imagine is actually telling someone that I attempted it. There are just some things better left unsaid. The nurse wrapped up my care requirements and encouraged me to get started straight away with a pain pill. I was still feeling substantially numb but reluctantly decided to take her advice. She brought me a pill, a cup of water, and finally, my long-awaited package of Lorna Doones. I downed them all.

Right around this time, however, the discharge process seemed to come to a screeching halt. My nurse left and came back and left. Time dwindled. Another nurse came and left. I started detaching rogue pieces of medical equipment from myself. I never did see my pants-burning nurse again, but finally, a man appeared at my door with a wheelchair for O’Neill. Mark sprinted for the car and while I waited in the lobby with my escort I realized that I was becoming increasingly nauseous. The dull headache I noticed two hours earlier was now a freight train barreling by at high speed. I had not eaten for 20 hours and my Lorna Doones were not holding their own.

By the time Mark got me to food, it was too late. A Divanni’s hoagie never looked so ugly. There was no turning back. I was in for a five-hour car trip to hell. Nothing helped. I was hot, I was cold, I was delirious, I was tortured. It was wretched. But finally, just as we made our final turn north, the vice grip on my head began to loosen ever so slightly. With my one working eye I saw Lake Superior’s frozen Chequamegon Bay come into focus and I actually felt slightly human. I could breathe.

frozen bay

Things only got better from there. I was in good hands and well cared for. A friend had left a pot of wild rice soup waiting and I was actually able to eat a few spoonfuls. It was exactly what my stomach wanted. Another friend brought by some Thai pork that made a lovely little Valentine’s Day dinner the following night. My local coffee shop sent up a bag of goodies.  I had everything I could need.

Everything that is, except I still felt jilted out of my post-surgery Lorna Doones. They had become such a tainted memory. And since I am hopeful there is not another surgery in my near future, I decided to treat myself to a batch of shortbread cookies. The recipe I settled on is just what I was after. Buttery, salty, and just ever so slightly sweet. They are as fitting with a cup of tea as they are a glass of wine. The semolina flour gives them a delectable crumble.

shortbread

Canestrelli (Shortbread from Ovada)
adapted from The Essential New York Times Cookbook

1 1/2 cups flour
1/2 cup semolina flour
8 ounces salted butter, softened
1/2 cup sugar
pinch of kosher salt

Sift together the flour and semolina and set aside.

Beat the butter with an electric mixer on high speed for a minute or two. Add in the sugar and continue beating until light and fluffy. Lower the speed of the mixer and gradually add the flour mixture, continually scraping down the walls of the mixer bowl, and mixing until the ingredients are just blended. Don’t overmix! The dough will be somewhat crumbly.

Press the dough together into a ball and place on a lightly floured surface. Place a piece of parchment or wax paper over the dough and roll it out to a quarter-inch thickness. Cut the dough into shapes with a cutter or small juice glass.

Transfer the cookies to a baking sheet with a metal spatula. Before baking, prick them all over with the tines of a fork. Chill any unused dough while the cookies bake in a 325ºF oven for 15 – 20 minutes until just a hint of color begins to show. Remove and transfer to a wire rack. Makes about 3 dozen 2-inch cookies or 2 dozen 3-inch cookies.

short-stack

kick in the pants

I’ve been putting off writing. Because every time I sit down, there is only one thing that presents itself in forefront of my brain. And this “thing” immediately leads to a sad, twisted up knot in my stomach. But I’ve finally decided to stop fighting and go face to face with it.

gitche gumee

My friend Hannah is suffering a terrible loss. Last week she lost her very best best friend. Her husband. Here was a man who was a constant example of what it really means to live the life you love. Tragically and unexplainably, the untamable waters of Lake Superior took the life he was so passionate about. Jimmy only got 34 years in. But he made the most of them. And Hannah, through her grief, is graceful enough to embrace the fact that Jim died doing something he loved. Ice fishing.

If Hannah can find solace in this, shouldn’t I too be able to focus on this tiny pin-prick of light? I see it, but it keeps darting around. Because no matter how you cut it, I just don’t want Hannah to have to accept a new reality. Like always though, Hannah is charging though life, already ten steps ahead of me. I don’t know who poured all of the strength into this petite, firecracker of a woman, but she is brimming with it. And that, at least, is something that brings me hope.

I’ve been ruminating all week on what it means to be passionate. It’s not an easy topic (at least not for me, anyway, and I’m fairly enthusiastic about life). How do you find your true passion? And once you’ve found it, how do you incorporate into your life? In essence, how do you become your passion? And what do you do if you get stuck along the way? I don’t know the answers, but I figure I owe it to Jim, to Hannah, and to myself to really put some effort into it. We all do. Image a world where everyone radiates such a love of living.

Jim “got it.” He figured out the answers to these complex questions. And Hannah gets it too. She credits Jim for teaching her how to love life and never do something you don’t love, but I know they fueled each other on this. The truly amazing thing, though, is that I’m pretty sure this tragedy will only set Hannah’s flame for life even higher. That’s how well she gets it.

And if that isn’t a kick in the pants to give your life an honest to goodness assessment, I don’t know what is. I’m continuing to send every drop of love and strength I have to Hannah, but now – I realize – it’s with my eyes wide open, my ears pricked, and my heart a little more exposed. I’ve been slapped with the message that it’s time to sit up and pay attention. And at the moment, there are only two people I can thank for the call.

pie for hannah

Hannah needs love and support, but she also very clearly needs chocolate. Preferably topped with Nutella.

Brownie Pie for Hannah
From Momofuku’s Milk, Christina Tosi

Graham Crust

1 1/2 cups (190 grams) graham cracker crumbs
1/4 cup (20 grams) milk powder
2 tablespoons (25 grams) sugar
3/4 teaspoon (3 grams) kosher salt
1/4 cup (1/2 stick or 55 grams) butter, melted<
1/4 cup (55 grams) heavy cream

In a medium bowl, toss the graham crumbs, milk powder, sugar and salt with your hands to evenly distribute the dry ingredients.

Melt the butter in a small sauce pan. Let cool slightly and whisk in the cream. Add to the dry ingredients and toss again to evenly distribute. The mixture should hold its shape if squeezed tightly in the palm of your hand. If it is not moist enough, melt an additional 1 tablespoon of butter and add it to the mixture. Set aside.

Pie Filling

4 1/2 ounces (125 grams) bitter sweet chocolate
6 tablespoons (85 grams) butter
2 eggs
3/4 cup (150 grams) sugar
1/4 cup (40 grams) flour
3 tablespoons (25 grams) cocoa powder
1/2 teaspoon (2 grams) kosher salt
1/2 cup (110 grams) heavy cream

Press about 1 1/4 cups of the the graham crumb mixture into a 10-inch pie pan, working it evenly up the sides. Add another 1/4 or so of crumbs if you need to fill in anywhere. Set the remaining graham crumb mixture aside.

Combine the chocolate and butter in a heat proof bowl set over a pan of simmering water and gently melt them together on low heat. Stir until the mixture is glossy and smooth. Set aside.

In the bowl of a stand mixer fitted with the whisk attachment, combine the eggs and sugar and whip together on high speed for 3 to 4 minutes, until the mixture is fluffy and pale yellow and has reached the ribbon state. (To test, drag the whisk or a spatula through the mixture – it should form a thickened, silky ribbon that falls and then disappears into the batter.)

Switch to the paddle attachment and slowly drizzle the chocolate mixture into the eggs on low speed, then increase the speed to medium for about 1 minute Scrape down the sides of the bowl.

Add the flour, cocoa powder and salt and paddle on low speed for another minute or so until there are no clumps. Stream in the  cream on low speed, mixing for 30 to 45 seconds, until the cream is just mixed in.

Remove the bowl from the mixer and scrape down the sides of the bowl. Gently fold in 1/3 cup of the remaining graham crumbs into the batter. (This means you will have a small bowl of crumbs leftover that makes a delightful little pinch snack.)

Fill the pie crust with the filling, put the pie pan on a sheet pan and bake in a 350º F oven for about 25-30 minutes until the pie is slightly puffy and set in the middle.

Cool and serve with a dusting of powdered sugar. Or, (particualarily if you are making this pie for Hannah) spread a thin layer of Nutella over the top.

empty shell

instapig

No Instagram images were found.