Archive for the 'dairy' Category

sandwich trials

My friend Julie is a farm girl through and through. She grew up on a southern Wisconsin dairy farm. Julie is the type who works until the work is done. And she’ll take on just about anything. The other thing about Julie is that she doesn’t get sick. You might catch her with a raspy voice or the sniffles, but if you ask her if she’s coming down with something, she’ll laugh and say it’s nothing. Being sick was not part of her upbringing. You just don’t get sick on a dairy farm. Julie so doesn’t understand what it means to be sick or injured that sometimes I have to remind her to be sympathetic to her husband and children when they’re ailing.

Not surprisingly, this dairy girl harbors a deep love of cheese. I’ll never forget one of the first times we were out to dinner and Julie ordered a cheese plate for dessert. Why cheese, I wondered, when we had access to things like molten chocolate cake, peach pavlova with tarragon ice cream, and warm pecan-wild rice cake with de leche sauce? But this was way back in the dark ages before I was properly educated about the beauty of good cheese. Though I still might go for the warm wild rice cake.

cheese

I have made great strides in the world of cheese however. Generally you can find a handful of specialty cheeses nestled alongside the mozzarella and cheddar in my fridge. My cheese drawer is particularly well endowed at the moment. My friend Mary recently found her way to Fromagination in Madison and brought me back some true gems. I’m especially in love with a cheddar-blue duo. In the summers I practically live on Sassy Nanny’s fresh chev. Smeared on warm toast with honey for breakfast, paired with a tomato sandwich for lunch, and tossed in a grain salad for dinner. Those days can’t come soon enough.

I regularly get e-mails from Julie, but a few weeks ago one message arrived with an alluring subject. “Grilled Cheese.” There was a link inside to what Julie described as the “photo contest I’ve been waiting for all of my life.” Are you aware there is a National Grilled Cheese Sandwich Day? No, me either. But there is, of course. In fact, it turns out that the entire month of April has been devoted to the grilled cheese sandwich. And to celebrate, Culture magazine held a photo contest.

I’m okay with Grilled Cheese Sandwich month. A grilled cheese is a perfect work at home lunch. I love dreaming up wild combinations. Cheddar with mango and jalepeños, baby swiss with kraut and russian dressing, blue cheese with tomato and honey, gouda with apple and touch of horseradish. I’m not fussy and nothing perks up a dull work day like a little lunch time experiment. My routine is to get the griddle heating up, open the fridge and pull out a handful of things that might work together. I’m rarely disappointed.

hot-brie

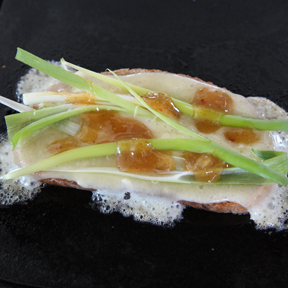
For my most recent sandwich trial I chose a creamy Grate Lakes Brie from the cheese drawer, julienned a few scallions, grilled it up on a light rye and topped it off with a hot mango chutney. In Julie’s honor, I dutifully got out the camera before gobbling it down. Hunger got the better of my creativity, but I sent in my submission to Culture anyway. Because I’d like nothing more than to win the big cheese prize and invite Julie over for dessert.

bad situation

It’s time to get back to the business at hand here. We’re way over due for a garlic talk. The honeybee drama has sort of hogged the stage lately. Truth be told though, I’m having as much trouble with the garlic as I’ve has with the bees. And I’m sort of in denial about it. If nothing else, the bees have been providing a nice distraction.
I’ll cut right to the chase. In my 18 years of growing garlic, I have never had things go quite so wrong. Sure, I’ve harvested some varieties way too late, mislabeled others, and have even had some surface mold issues. But this – this is something all together different. Everything was smooth sailing, right up until about a week before harvest. Almost overnight though, my generally healthy looking garlic plot turned yellow and crunchy. Nearly every single plant, of every single variety. This is when the denial started. We’re in sort of a drought, I rationalized. It’s natural for things to dry up and get crispy, right?
garlic decline
I bumped up my harvest schedule and started pulling varieties as fast as I could. Things didn’t look too bad, but the plants just didn’t seem right. The average head size was maybe a tad smaller than normal, but overall the heads seemed firm. The curing shed gradually filled up and looked like it looks every fall, but I left it hanging to dry with sort of queazy feeling in my stomach.
I decided that the best I could do at this point was a some research. I learned, rather shockingly, that much of the garlic crop in the midwest has been affected by a bacteria called Phytoplasma. Yellowing leaves and premature browning is a key symptom. Many growers in Iowa, Wisconsin, and Minnesota are reporting up to 100% crop loss. Gulp.
The bacteria (which are tricky to detect due to their lack of a cell wall) appear to be spread from plant to plant by leafhoppers. Phytoplasma seriously affected garlic production in Edmonton, Canada 13 years ago, and in Cordoba, Argentina 15 years ago. One scientific paper I read out of Argentina refers to the disease repeatedly as ‘Tristeza del ajo’ or ‘the garlic decline.’ How sad is that? Evidentially many Midwestern crops, flowers, and vegetables have been infected by Phytoplasma disease this year.
If there is any good news in all this, it’s that the bacteria affects only the growing parts of the plant and does not infect the soil or move through the air. The bad news though, and it’s bad, is that Phytoplasma will likely overwinter in infected bulbs and the disease will carry over into the next year’s crop. This means, of course, that it is not a good idea to plant infected seed. See why I’m in still in denial? I’m one sad little garlic pig.
garlic in wiaitng
I have just a wee bit of what appears to be non-infected, normal seed. But even the thought of planting that makes me nervous. And I have quite a lot of infected bulbs. They also make me nervous. Once you get past peeling away their unnaturally ruddy-brown papers, the cloves are normal and safe to eat, but something tells me they may not store very well. Consequently we’ve been eating a lot of garlic intensive meals this fall. I’m doing my best to make the most of a bad situation.
Serving up Yotam Ottolenhi’s Caramelized Garlic Tart has certainly helped. I’m pretty sure I could eat this endlessly. Which is good, because I might have to in order to get through all of my declining garlic. Pair it with a simple green salad for a fantastic dinner. Or serve it up for brunch. Either way, get ready for a heavenly mix of savory cheeses and sweet caramelized garlic. It is simply delicious. And it’s bound to ease some troubles – garlic or otherwise.
garlic tart

Caramelized Garlic Tart
Adapted from Yotam Ottolenghi’s Plenty

1 sheet (8 1/2 oz) puff pastry
3 heads of garlic (3-4 ounces total), separted and peeled
1 tablespoon olive oil
2 teaspoons balsamic vinegar
1 scant cup water
2 teaspoons sugar
1 tsp fresh thyme, chopped
1 teaspoon fresh rosemary, chopped
4 oz soft goat cheese (chev)
4 oz gruyere, shredded (or any similar hard cheese)
2 eggs
1/3 cup cream or half and half
1/3 cup crème fraîche
salt and pepper, to taste

Use a 9 1/2 to 10 inch tart pan with a removable bottom for this recipe. It makes serving it a dream.

Roll out the puff pastry so it will fill the bottom and line the sides of the tart pan. Transfer to pan and trim any excess. Cut a circle of parchment the diameter of the pan and lay over the pastry. Fill up with baking beans of pie beads and refrigerate for 20 minutes.

Blind bake the pastry shell in a 350ºF oven for 20 minutes. The beans or weights keep the pastry from puffing – leaving room for the filling. Remove the beans and bake for an additional 10 minutes until golden. Once done, set aside to cool.

While the pastry shell bakes, caramelize the garlic. Put the cloves in a small saucepan and add enough water to cover entirely. Bring to a boil and blanch for 3 minutes. Drain and dry the garlic. Return the pan to the heat, add oil and fry the garlic cloves in it over medium heat for a couple of minutes. Add the balsamic vinegar and water and bring it to a boil. Turn down the heat, and let it simmer for another 15 – 20 minutes until most of the liquid has evaporated and the garlic is coated in a lucious glaze. Set aside.

Whisk together the eggs, cream, crème fraîche, salt and pepper in a bowl.

To assemble the tart, scatter the baked pastry shell with both cheese. Sppon the garlic and its syrup over the cheese. Pour the egg and cream mixture over the top. Reduce the oven to 300ºF and bake for 30 – 45 minutes, until the tart is set and nicely golden brown. Garnish with thyme sprigs. Serves 8.

pie beans

dark dairy days

I have to say that I am not much of a milk drinker. Prior to the Dark Days Challenge, I can’t even tell you the last time I bought a quart of milk. We do use a bit of fresh goat milk (when it’s in season) courtesy of my favorite ladies at Sassy Nanny Farmstead Cheese. And every now and then we’ll open a box of rice milk to see us through. But the DD Challenge proposed a dilemma. Boxed rice milk is far from local, and the girls at Sassy Nanny weren’t producing during the darkest days of winter. I realized that although I may not feel the urge to sit down to a tall glass of cold milk, I might just start craving cheese, butter, and yogurt on local nights.
And so early last December, towards the beginning of the 50-mile radius foods challenge, I made a memorable trip to Tetzner’s – our local cow dairy. I bought 3 quarts of cream and 4 quarts of milk. It proceeded to sit in the fridge for a good number of days until I finally decided I had better do something with it. I went straight for the gold and made a tub of ice cream and pound of butter. Emboldened with my success, I moved on to yogurt and kefir. And I have been having a dairy heyday ever since. Jars of fresh cream and milk have become regulars in our refrigerator this winter.
I have a huge new crush on homemade kefir. I’ve had it store-bought from a carton many times, but it has always struck me as too sharp and too tangy. I never go out of my way for it. So I was pleased to find that my homemade version is bright and smooth. It’s so easy to drink and eat just plain with nothing added. I started my initial batch with a kefir starter that I ordered online. I have been using either that or a few tablespoons of existing kefir as starter, both with good results. But now I’m so infatuated that I want to want to take things one step further and search out some actual kefir grains. I learned in my research that the Turkish word “keif” translates to “feel good.” And now I know why.
Homemade ricotta was next on my list. I couldn’t believe how easy it was. It took all of 15 minutes (plus 20 more minutes for it to drain through cheesecloth). The taste is so superior to store bought that I don’t think I’ll ever go back. Like most of these homemade dairy products, the price breakdown is comparable to store bought but with several other benefits –  it’s local, it’s fresh, the taste is outstanding, AND I don’t have to litter my cupboard (or landfill) with wayward little plastic yogurt, cheese, and ice cream containers.
Throughout all of my dark days dairy escapades this winter, I kept coming back to the butter. My inaugural batch was good, but that was all. Just good. I had a taste off with a few store-bought butters I had on hand and it didn’t compare. Mine tasted overly milky, and (for lack of a better descriptive) boring. Especially next to the newest love of my life – a butter from  Rochdale Farms, a small creamery in southern Wisconsin.
I discovered this marvelous, hand-rolled butter about a year ago at a food co-op in Minneapolis. I proceeded to became so addicted to it that I wouldn’t make a trip to the Twin Cities without a small cooler in tow so I could bring home several pounds for the freezer. I even went so far as to plan a trip to the cities (4 1/2 hours one way) based purely on the fact that we were out of butter – though I didn’t openly admit this scheme at the time. But it’s okay. I’m in recovery now. Mostly because I worked all winter to create a clone of Rochdale butter.
First I had to discern what is is about this butter that sets it apart from other butters (even really good butters). It has a tang and saltiness that is unmatched in other contenders (especially mine). I went online to do a little research. Sure enough, I discovered that Rochadle Farms adds a bit of cultured whey to each small batch of butter they make. That would explain the unique tanginess. I didn’t have cultured whey – and wasn’t sure how to go about making it, but I did have cultured kefir. Ding! I was onto something. A bit more research and I had formulated a recipe for cultured butter. After one or two attempts and tweaks, I successfully absolved my dependence on Rochdale Farms butter. Because now I can make it all on my own at a moments notice. Not, of course, without the help of the cows at Tetzner’s Dairy who have earned my enduring gratitude.
I haven’t tried this using yogurt as a culture, but I think it would work just as well. Just be sure it is plain yogurt that still has live cultures in it.

Cultured Butter

3 cups heavy cream (not ultra-pasturized)
2 tablespoons kefir
1/8 – 1/2 teaspoon fine sea slat (optional)

Pour cream and kefir into a large glass measuring cup or bowl. Gently stir to combine. Cover with a clean towel and allow to rest in a warm spot (about 75 degrees F) overnight.

The cream mixture should be somewhat thick by this point. Pour cream into the bowl of a food processor or an electric mixer and process on high speed. It will thicken almost immediately, and then turn to whipped cream. As it continues to thicken, begin to watch for a slight graininess. Shortly after this it will become noticeably yellow, grainy, and butter will clump together in the bowl. Stop processing as soon as you see butter clumping together – it’s important not to re-integrate the butter back into the buttermilk. This whole amazing process takes a mere 2 – 4 minutes.

Pour the buttermilk off (you can use this in muffins, pancakes, fruit smoothies, etc.). Refrigerate the butter for about an hour to firm it up for final removal of buttermilk.

Press and knead the chilled butter using your hands or the back of a wooden spoon. The goal is to work out every last drop of buttermilk. This is also a great time to knead in salt if you want salted butter. I like a salty butter when I’m not cooking with it, so I use a half teaspoon. Rinse the butter several times in ice-cold water as you knead; once the water runs clear, the butter is done.
Roll into a sheet of wax or parchment paper and store in the refrigerator or freezer.

Makes about 3/4 pound butter.


instapig

No Instagram images were found.