Archive for the 'snacky-snacks' Category

going rogue

Remember last fall when I was oozing uncertainty about another season of bee keeping? Well. The tables have turned. I’m not sure exactly what transpired, but I’ve done a one-eighty. Spring can’t come fast enough (and, just for the record, it isn’t).

spring honeybee hive

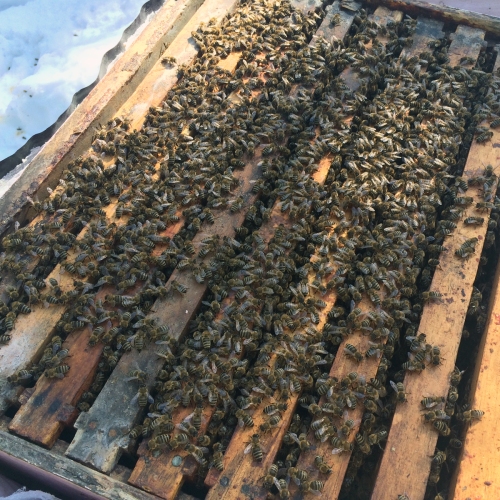
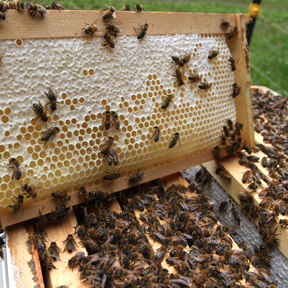
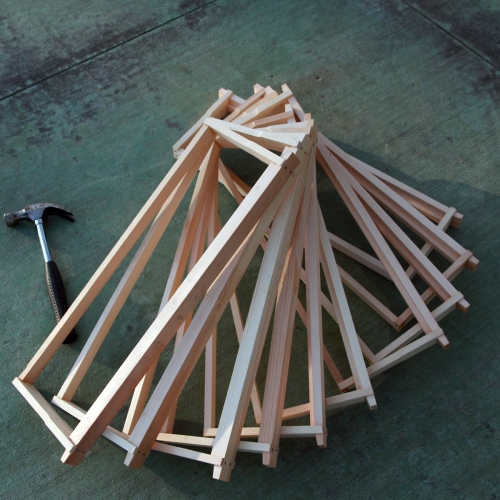
I’ve got big changes up my sleeve. I’m switching from deep hive boxes to mediums. Which basically translates to “easier” lifting. Wait. Did you hear that? It was my back, already sighing with relief. I’m also converting to foundationless frames. This means my bees will draw out 100 percent of their honey comb instead of getting a pre-made starter sheet of wax foundation to guide them.

There are so many reasons why foundationless feels like the right way to go. The most obvious is that bees have drawn out their own comb for hundreds of centuries. Why we felt the need to introduce starter comb to show them the ropes, isn’t entirely clear. Also at the top of the list is a naturally healthier hive. Left to their own devices, bees tend to make smaller cell spaces. This decreases the amount of time larvae spend in the capped cells before hatching out. The shorter development time interrupts the lifecycle of the deadly varroa mite. And, foundation (which is made mostly out of wax from commercial hives) is laced with trace chemicals. Yuck. The bees have it hard enough. Why bring more garbage into their hives?

foundationless frames

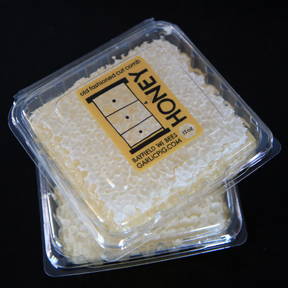
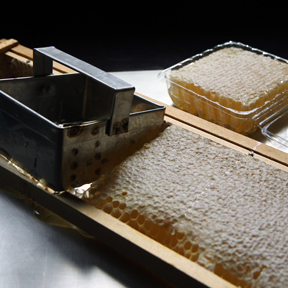
I also want to raise more cut comb honey. Which means I’m going to do some radical moves this summer, like “double shook swarming” (a technique that’s just plain fun to say, if nothing else). I’ll spare you the details, but it involves strategically separating hives, placing the components back to back during the prime nectar flow and reorienting/reuniting the boxes again in the fall.

I love cut comb honey. There is, in my book, nothing finer. But for whatever reason, there’s less of a demand for it. People are shy about how to eat it. Which always steers me towards producing more extracted honey. This year though, markets be dammed. I’m ready to spread the gospel.    

These changes are invigorating. Interestingly, my decisions happened through no real process. And that’s what feels so great about it. I’m type A. I plan. I figure. I troubleshoot before the trouble. And there is always a process. This time though, answers just sort of landed in my lap without my brain inserting itself. I’m not only bucking some conventional beekeeping methods, I’m shaking up my general life strategy to boot. I’m going rogue. And I didn’t even plan it!

I’ve mentioned before how my bees bring out the best in me. They slow me down. They make me take notice. And they repeatedly remind me that there is never a concrete answer. Ever. But now they’ve taken it up a notch. They’ve outdone themselves. I let go, threw it all out there, and this is their answer. You know that Zen proverb, about the teacher appearing when the student is ready? Evidently I’m ready. Thanks girls.

cut comb revival

This isn’t a recipe, so much as a mini-manifesto. Paring knife required.

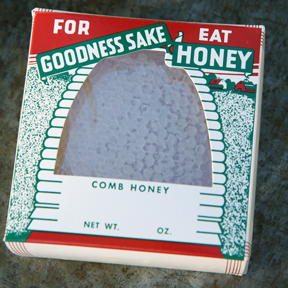
What’s all the fuss about cut comb honey? Plenty. 

At the very least, you can start your day by dropping a spoonful of honeycomb in the bottom of your cereal bowl. Smother it with hot oatmeal, add a pat of butter, a splash of milk, and swirl it all together for a breakfast that will give any cold, grey morning a run for its money. Wash it down with a shot of espresso and you’ll wonder why every morning can’t be cold and grey.

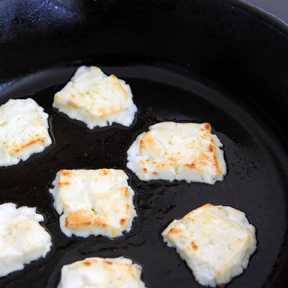
But summer will come, eventually. And when it does, you can drag your chair out to the patio, set out a slab of comb honey, some good French feta, a baguette, and if you’re lucky, a nice chunky beefsteak tomato. Pour a glass of strong sun tea and stay awhile. Hell, knock out a crossword. You’ve got all morning.

Sooner or later, though, you should get motivated. It is, after all, summer–ice cream season. Pairings are endless, but if you need a starting point, try your hand at a batch of fresh fig ice cream and top your cone with a thin sliver of honey comb. It’ll make you rethink the merits of those cold, grey mornings.

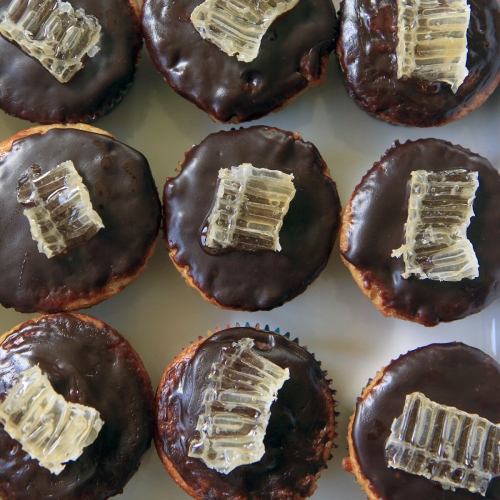
Still, when the weather turns and cool nights start rolling in, it means you can throw together big plates of crisp pears, spiced nuts, blue cheese, comb honey, and a nice pumpernickel. Set out some cold salted butter and call it dinner. But do save room for desert. There’s cupcakes glazed with bittersweet chocolate and honeycomb.

honey cupcakes with honeycomb

undiluted joy

Holy winter did we get snow last week. The fifteen or so inches that fell isn’t a particularly unusual accumulation for the Lake Superior snow belt, but it was a wee bit early. I think we can all agree on that. The storm caught almost all of us off guard. Climate change is so unsettling, isn’t it?

cold-guy

Needless to say, it took almost twenty four hours for me to remember my bees. My bees! The electric fencer is still plugged in and is now shorting out! The bottom air vents on the hives are buried in snow! My bees need me! Clearly I was going to be late for work.

That’s the thing about winter that I always forget. Everything takes LONGER. Getting dressed takes longer – stripy tight season, long underwear, and multiple layers. Getting out the door takes longer – which coat, what scarf, and where’s my hat? Warming up (please start) and scrapping the car takes longer. And the commute. The commute is a lesson in patience that takes F-O-R-E-V-E-R. Eventually this all becomes second nature. But the first week is brutal.

I did make a detour to the bee yard on my way to work, but I was frazzled by the time I got there. I donned my snow pants (more layers, yea!), grabbed my green shovel, and tromped through the snow to unplug the electric fence. I scraped out around the hives and snuggled up close to have a listen inside. The moment I heard their low, sweet buzz, I sank down in the snow and sighed. It gets me every time.

Suddenly I wasn’t late for work. I wasn’t ticked offed by winter’s early onset. And I didn’t care that my entire left sock was half way down my heel. I was just with my bees. It was that simple. Eventually I pulled myself away and landed back in the reality of Wednesday. But for a good minute or two I was in a state of undiluted joy. Which may not sound like much, but I’ll take it. Those two minutes carried me through the rest of a very long week, thank you.

hive-cap

As luck would have it, I also have a stack of honey comb in the pantry to help carry me though the brunt of winter. There’s plenty of extracted liquid honey too, which is nice for cooking and baking, but for almost any other use, I reach for comb honey. It’s like regular honey, only supercharged with texture and flavor. And it’s laced with enzymes and pollen to boot.

Comb honey used to be the honey of choice among consumers because it was guaranteed 100 percent honey with no additives. But once bottled honey became a regulated commodity in the early 1900’s, comb honey gradually fell out of fashion. It’s slowly becoming trendy, but even so, a lot of people just aren’t sure what to do with it. And I don’t blame them. Because really, you’re asking them to eat wax. Nowhere in the food pyramid does wax appear.

comb honey

I initiate people by suggesting they dip a knife into the comb honey and spread a thin layer onto warm buttered toast. This comes with the caveat that doing so could lead to an excessive desire for toast and honey. Which really, in the scheme of things, isn’t so bad. Is it?

Comb honey is also melts deliciously into oatmeal and hot cereals. I like it in my tea too – most of the comb dissolves, but there are usually a few mini honey rafts floating about that I quite enjoy. It’s terrific sliced thin and served with cheese and fruit (blue cheese and crisp pears are a favorite). Very dark, bitter chocolate and a dab of comb honey is a duo to write home about. And it’s an unbeatable, natural sweet pick me up when eaten straight by the spoonful – chewy and soothing.

I use comb honey liberally in the kitchen. I like to experiment and see what it does to flavors. My only rules are to slice it thin and use it sparingly. I want it to complement, not overshadow.  When I needed a fast appetizer a few months ago, I stuck some feta cheese under the broiler for a few minutes, opened a box of rice crackers and assembled little baked feta honey bites. It was so easy and good that I’ve repeated it a half dozen times since. It’s got that sweet, salty, savory mix that I love.

Winter may have come earlier than expected, but its chilly winds bring a welcomed kick in the pants to get back in the kitchen and play. Eat well and keep cozy!

honey bites

P.S. The bees had a marvelous summer and I do have extra comb honey and bottled honey for sale. Comb honey is tricky to ship, but if you live in the Chequamegon Bay Area, I deliver! More info here.

Roasted Feta Honey Bites

These are dynamite served while the feta is still warm, but they are mighty fine at room temperature too.

feta cheese
olive oil
comb honey
crackers

Slice the feta into pieces about 3/8” thick. Place on a lightly oiled baking sheet or cast iron skillet. Drizzle very lightly with olive oil.

Broil the cheese until it is just beginning to turn golden brown on top, about 5 minutes, depending on your broiler. Watch it closely! It will get a little bit melty, but once it cools it holds it’s shape nicely.

Remove from oven and let cool a few minutes. When it is firm enough to handle, use a spatula or knife to transfer cheese pieces to individual crackers.

Top each with a thin slice of comb honey.

baked fets

sweet perk

September is looking up. Not only is it National Yoga month, it’s also National Honey month. Hard to go wrong with either one in my book. Oddly enough, they generally go hand in hand for me. My back typically needs a dose of yoga after slinging around fifty pound boxes of bees and honey. Beekeeping is a weird balance between delicate finesse and sheer brawn.

Overall it was a pretty quiet summer in the bee yard. Nothing compared to last summer’s drama. Since I started the season with two young hives, my main goal was to grow each hive from one box of bees into three so they will be ready for a long Wisconsin winter. Things got off to a painfully slow start. Cold weather kept the bees a solid month behind schedule. I conceded early on that there would not be much of a honey harvest this year. Leaving it instead for the bees’ winter supply.

full-house

I got my new bees from my good friend Kris at Wild Girl Farm, but the queens came form neighboring apiaries in northern California. Queen Hallie Frances has a two week head start on Queen EB and it showed all summer long. Hallie’s hive hit a population boom at just the right time. When the Basswood stared blooming, she had a fleet of foragers ready to go in full force. They started packing so much nectar into their hive, it caused me to reconsider my decision not to pull any honey off.

This was in July, and Hallie Fances’s girls were just outgrowing their second box. I needed to decided quickly if I wanted to add their third hive box, or put on a honey super instead. I did a mental flip through the calendar, calculating how much time they would have to fill a third hive box if I interrupted things with a honey super. And then there was the question of what kind of honey super. I could give them drawn out comb that would later be run through the honey extractor, or I could put on some thin sheets of beeswax, letting them draw it out and make cut comb honey instead – a riskier and slightly more intensive undertaking.

I say “riskier” because in my experience, having bees successfully produce comb honey takes a certain sort of hive. They have to be strong, willing, and ready. And the hive needs to be managed in such a way that they have just barely enough room. Not so cramped that they’ll want to swarm, but tight enough so they don’t get all willy-nilly about their cut comb project. Some hives have what it takes and some hives don’t. Enough failures and successes have taught me to spot good candidates.

I love honey in any form – raw, baked into things, creamed – but pure comb honey is my favorite. The comb is imbibed with enzymes, traces of pollen, and subtle floral essences, all providing an extra richness and depth of flavor. And it adds a versatility that bottled honey lacks. You can slice it, crumble it, spread it, and above all – chew on it. Back in the old days cut comb was the honey product of choice. In fact there is even a historical “comb honey” era on the books from about 1880 to 1915. There were no Pure Food and Drug Laws in the U.S. until 1906 – which meant that a lot of bottled honey was spiked with corn syrup, which also meant a lot of consumers avoided it, opting instead for pure cut comb. No filler added.

honey comb

I sat down to consider my options, watching the rush hour traffic come and go from Hallie Frances’s hive. The girls were practically radiating determination. And that did it. I decided to hedge my bets and go for the gold. I got up and went for the cut comb super I had waiting in the car.

And sure enough, they took to their cut comb duty head-on, drawing it out, packing it full, and capping it over – all before the Basswood flow even finished. Rockstars. I slipped the comb super off and replaced it with their third hive box before I left on our annual Boundary Waters canoe trip. And now their third box is nearly packed full, ready for winter.

Queen EB never quite caught up with her roaring neighbor, but her girl’s held their own. They are just shy of 3 boxes, and will most likely spend the winter in 2 deep and 1 shallow box, which should do the trick. But the best part about both hives is their chill attitude and sunny disposition. When I slide their inner covers off, they generally buzz up, like old friends, glad to see me. One of the sweet perks of keeping bees.

cut-comb

Eating Cut Comb Honey

As-is: cut off a chunk and chew on it. It’s great for a simple after dinner sweet, or if you need a mid-day energy boost. After the honey is gone, the wax will turn into an almost everlasting piece of gum that you can chew and spit out whenever. If you chew long enough, it will slowly start to dissolve. Some people advocate it’s quite good for you.

Thinly sliced: use a pairing knife to cut thin slices. Add to cheese and fruit plates plates. Blue cheese on a thin cracker topped with honeycomb is excellent. As is a crisp pear slice with ricotta and honeycomb. Cheddar, fresh jalepeño slice and sliver of comb honey is another winner. Manchego and Granny Smith? The possibilities are endless here people!

Spooned/Crumbled: over hot cereal with a dab of butter. Fall mornings never looked so good.

Spread: onto warm buttered toast. The comb and honey will melt into deliciousness all over your toast.

goodness-sake comb honey box

hidden gems

When I was a kid of about ten or eleven, I knew something that my cousins didn’t. I knew that my Grandma Myrtle would often set her fancy holiday table days before the actual event. I was privy to this insider information because out of nine grandkids, my brother and I were the only two who came from out of town. So unlike our cousins, we’d generally arrive at Grandma’s house a few days prior to any holiday. And almost always, we’d race in to find the table expanded to full capacity and set with her fine china. I always thought this was funny and sort of strange. Didn’t she have anything better to do, I wondered?

Well. Bite my tongue. Having just hosted my first ever, full blown Thanksgiving – I’m here to tell you that it turns out Grandma did have something better to do. Like maybe the prep work for a big ol’ roast turkey, a half dozen sides, and a couple of deserts. Oh, and she might have spent some time tidying the house and making sure there were clean sheets for the company. I wasn’t far into my own holiday preparations before I decided to take a page from Myrtle’s book and get the table set. Clearly she was onto something.
thanksgiving table
My table wasn’t as fancy as Grandma’s, but it got the job done. Butcher paper and crayons stood in for a long table cloth that I don’t own. Simple fall fruits and pinecones took the place of a flower arrangement. And my Grandma Marjorie’s china got a long-awaited reviaval. When my two nieces burst into my kitchen on Wednesday, I chuckled and gave a nod to Myrtle after they realized the table wasn’t set for that night’s meal. “Wait,” one of them asked incredulously, “This is for tomorrow?” I assured them that someday they’d understand. And then I told them about their great Grandma Myrtle.
Overall my inaugural Thanksgiving hosting went pretty well. My family was very forgiving of all my racing around. And they didn’t even mention that flash freezing my Parker House rolls after their final rise didn’t exactly work. There were a few things I would do differently in the kitchen next time, but by in large, it was a perfect holiday. There was good old-fashioned charades, custom made word-finds, and scavenger hunts. We even managed to get out and run the Chequamgon Bay 5k Turkey Trot on Thanksgiving morning.
We did, of course, find plenty of time to eat between all these activities. On the food front, I’d say there were two hidden gems. One was the surprise “banana tower” that my niece Evie constructed for us the morning after our big feast. It is as straightforward as it sounds – a raging tower of banana pieces. But we all agreed that the bananas were perfectly ripe. And plucking them off the tower one by one was especially gratifying.
Evie
The other star was a simple appetizer that really held its own, even against our succulent heritage turkey with bacon-herb butter stuffed under it’s skin. Keeping with the bacon theme, I knew I wanted to do a bacon wrapped something for a pre-meal tidbit. For the kids I decided I couldn’t go wrong with pineapple chunks wrapped in bacon. And for the adults, I found an old Gourmet recipe that fit what I was after perfectly. Bacon wrapped Parmesan-stuffed dates. Each bite offers a mini explosion of smokey, salty, and sweet. They’re satisfying without being overly rich and pair nicely with a glass of wine. And they are a cinch to make. On a whim I gave both the kid and adult versions a light drizzle of honey before popping them in the oven. Because what isn’t made better by a light drizzle of honey? Hope you all had a holiday that was sweet and cozy.
stuffed date
Bacon Wrapped Parmesan-Stuffed Dates
(Adapted from Gourmet)

12 Medjool dates
12 matchstick size pieces of Parmesan (about 1-inch by 1/8-inch)
4 bacon slices, raw – cut into thirds
Honey

Make a slit in each date with a paring knife and remove the pit. Stuff one piece of cheese into each date through the same slit. Wrap each date with a third piece of bacon, covering the slit, and securing with a toothpick. Arrange assembled dates on a baking sheet and drizzle very lightly with honey. Bake in a 425º F oven for 10-15 minutes, or until the bacon is crisp. Drain on a paper towel and serve warm. Serves about 6.

turkey sketch

young love

Dear Dilly Beans,

I thought you should know that I’ve met someone new. And I’m positively smitten. Please know that it’s nothing personal. I still care for you. Really, I do. It’s just I’ve found someone who shares your same crunch, your same tang, and that fine dill flavor – but with so much more to offer. These beauties also have a subtle, well rounded garlic flavor packed into their jars. And to be fair, well, it’s because they are garlics. Garlic scapes anyways. I think my new love and I have a promising future together. I can see them on antipasto platters, mixed into salads, and bobbing around in tomato-based cocktails. And I’m already dreaming of the cold, dreary March afternoon when I pop the lid and start eating straight from the jar. I hope you can take comfort in the fact that without you, my dear Dilly Beans, I might not have ever even discovered my new crush. So I promise to make room for both of you on my plate. I only hope you can wait until my dilly scape honeymoon is over.

Sincerely,
Garlic Pig

It’s true. I’ve fallen for another. I was sort of set up though. It all started a week or so ago when I was reading through one of my latest favorite books (in preparation for kimchi and kraut season), Wild Fermentation by Sandor Ellix Katz when I came across his father’s recipe for classic dilly beans. Here’s where things start to get sticky. I knew there was a few pounds of fresh picked scapes waiting in the fridge. Hmmm. I did a quick google search that revealed that I wasn’t alone in my wayward ways. There are a handful of people out there who share my same wild thoughts.

Next, I went to my tattered copy of the Ball Blue Book of Canning and compared dilly bean recipes. I settled on a combination of the two recipes and got to work. I rationalized that it wasn’t intentionally going astray. I mean let’s be honest, the green beans are weeks away from being ready. I couldn’t have pickled them if I wanted to. I just settled for the next best thing, that’s all. How can I help it if I happened to fall head over heals?

Pickled Dilly Scpaes

1 pound fresh garlic scapes

1 1/4 cup water
1 1/4 cup white vinegar
2 1/2 tablespoons kosher salt

whole white peppercorns
dried hot chilies (I used bird’s eye)
fresh dill – heads or leaves, or a combination

Gather, wash, and sterilize your canning jars. If you really pack the jars tightly, one pound of trimmed scapes will fill about 36 ounces of jar space. I did a combination of 8 ounce, half pint jars and taller 12 ounce jars. If you don’t plan on doing a tight pack, you will need more jars AND more brining liquid, so plan accordingly.

Wash and dry the scapes (if necessary) and trim the tops, just below the bulging flower head. Do I need to remind you to save the tops to make a stock with? I didn’t think so. Next, do a quick jar measurement and trim the scapes to fit into whatever size jar you have chosen so there is about 1/2 inch of headspace. After you have trimmed all the scapes to size, pack them into the sterile jars, sort of bending out the curvy parts as you go. Add 1 fresh dill head (or leaves), 1 dried chili pepper and 2-3 peppercorns to each jar.

For the brining solution, bring the water, vinegar, and salt to boil in a saucepan and remove from heat after salt has dissolved.

Pour the hot brine into the jars, filling until there is 1/4 inch of headspace. Secure sterilized 2 part lids and process in a boiling hot water bath for 10 minutes. Remove from canner, let cool, label jars and store without bands for at least a few weeks to let the flavors develop.

here’s to exceptions

We skipped the Fourth of July fireworks this year. And the parades. And the community potluck. Instead, we stayed home, seared a rib eye on the grill, tossed up a fresh Cesar salad, cranked some Rachmaninov, and watched a perfect banana moon rise through the trees. If I had it my way, this is how we’d spend every Fourth of July. I’m just not a crowd person. Except for the Minnesota State Fair. I bend the rules for that. It’s in my blood. (48 days and counting).

The flowers have finally started blooming, which made for a very nice, very quiet firework display on our deck. The garlic scapes put on quite a show as well. They went all out, slathering themselves in a beer batter and then hoping into a pan of hot oil for the grand finale. And my, oh, my. They truly outdid themselves. But first, I need to tell you that I really don’t get into deep frying. I have a small kitchen, a finicky gas stove, and a lack of good ventilation. None of which is conducive for deep frying. Still, I lust after buttermilk fried chicken recipes and dream of all the summer tempura possibilities. Occasionally, on cold winter mornings especially, I’ll cave and turn out a batch of steamy honey donuts, but other than that, I don’t fry.
Until now. Now, I might have another exception on my hands. I’m full of them lately, aren’t I? You’ll be glad though – I promise. Light and crunchy on the outside, warm and creamy on the inside with just a tease of garlic flavor. I’ve been on a garlic scape cooking craze lately, and making something festive for our Fourth of July meal felt like the right thing to do. I pilfered my stash of “maybe, someday, after I’ve built myself an outdoor kitchen, I might actually fry something recipes” and pick and chose from them to come up with a good old-fashioned beer batter. I also mixed up a quick tamari dunking sauce which was a perfect match for these golden beauties.
So go on! Get yourself some scapes at the Saturday market. And then shed any frying fears you might harbor and give these a try. They are so very worth it.
p.s. Buy some extra scapes while you’re at it. Pickled Dilly Scapes are up next!
Beer Battered Garlic Scapes
1/2 pound fresh garlic scapes
spoonful rice flour
salt and pepper

1/2 cup rice flour
2 teaspoons cornstarch
1 small egg, beaten (or half of a large egg)
few dashes of Tabasco
up to 1/2 cup flat beer
oil for deep frying (Be sure to use something with a high smoking point. I used a combination of canola and peanut oil)

Trim the tops of the scapes just below the bulge (save the tops for soup stock if you wish). Give scapes a rinse under water and pat off most of the moisture with a towel. Toss them in a bowl with a spoonful of rice flour. Season generously with salt and pepper.
In a large, shallow dish, mix together the flour and cornstarch. Whisk in the beaten egg, tabasco and enough beer to make a thick batter.
Pour enough oil to reach an inch or two of depth into a heavy, deep sided pot, suitable for frying. Attach a thermometer and heat the oil to 375º F. Adjust the heat as you go to keep the oil as close to 375º F as possible, and be wary of hot oil and spatters. Dip the lightly floured scapes into the batter and use you fingers, if necessary to help coat the scape. Depending on the size of your pan, you can probably fry 2-3 scapes at a time, but be sure not to overcrowd them. Lower the scapes in the hot oil. Cook for a minute or two until they are golden brown, flipping once. Remove to a paper towel line platter. Continue battering and frying the scapes in small batches. Serve warm.
Serve 2

Tamari Dipping Sauce

3 tablespoons rice wine vinegar
1/4 cup tamari
1/2 teaspoon sugar
1 teaspoon toasted sesame oil
1 scallion, finely chopped
few strips of julienned carrot

Mix vinegar, tamari, sugar, and sesame oil in a small jar and shake lightly or whisk until combined. Pour into serving bowl and sprinkle with scallion and carrot. Adjust flavors if necessary.

hot pop

When it comes to popcorn, I’ve always been an Orville Redenbacher kind of girl. I think it was an early association I formed with my grandpa, whom I shared many a bowls of popcorn with, and who – coincidentally – also happened to be named Orville. I’ve tried my fair share of bulk co-op popcorn over the years too, but I often find myself reverting back to Orville’s famous gourmet popping corn. It still thrills me to open that vacuum-sealed jar. I can’t, however, say that I notice much of a taste difference between the two (sorry Orville). As long as there is a full jar of popcorn on the shelf, I’m satisfied.

Satisfied, that was, until one night last winter when my friend Danielle came to dinner. She brought her husband Jon along too, but almost as importantly, she brought us a jar of her uncle’s homegrown popcorn. It was a striking mix of ruby red and golden yellow kernels. I put it on the pantry shelf and it seemed to positively sparkle next to the neighboring jar of Orville Redenbacher’s.

It was so pretty that I actually put off popping it for quite some time. But when I did, I was forever changed. The popped kernels, albeit slightly more petite than Orville’s, were light and crisp with a freshness that I am sure I have never experienced. And the taste. It tasted like, well – corn. Sweet and creamy and crisp all at the same time.

I managed to stretch out the contents of the jar through the winter – supplementing with Orville’s and selfishly saving the good stuff for nights I knew my husband would be away. And in January when the garden seed catalogs started pouring in, I curled up on the couch and got serious. I settled on Pennsylvania Dutch Butter Popcorn. I am frequently swayed by the word “butter” in descriptions, and this was no exception.

And so this past summer, for the first time in my 17 years of gardening, I dedicated a corner of our plot to popcorn. I planted three four foot diameter circles two weeks after the sweet corn went in to avoid cross-pollination. I had a few setbacks over the summer, including a raccoon incident on a weekend we left town, and several discouraging remarks from friends saying they had tried popcorn in the past, but never found our growing season to be long enough. But I kept the faith and tended my circles. I shored up the breach in the fence, and was graced with a long, sweet fall. Shortly before out first frost on October 29, I harvested one full jar of corn. Still not entirely convinced of my success, I put a handful of kernels straight into the Whirley Pop. And sure enough, it popped! And the taste? Even better than I remembered. I’m already scheming how to fit more popcorn circles into next year’s garden.

I prefer to pop my popcorn in hot coconut oil and top it off with nothing but a sprinkling of Penzy’s Garlic Salt. But I also have a favorite honeyed-cayenne popcorn that I like to make for special occasions. It’s a great appetizer to serve at dinner parties – a little unexpected, but still sophisticated. In fact, I think it would make a lovely Thanksgiving Day hors d’oeuvre. Snoopy would be so proud.

A few notes on the recipe. I adapted this years ago form a recipe I clipped from Cooking Light. The original recipe calls for pure maple syrup, but since I have more bees in my possession than maple trees, I tweaked it to use honey. Both are quite good though. Omit the water if you go the maple route. I also increased the amount of corn for a better popcorn to syrup ratio. You can vary the amount and type of chili pepper. I have settled on 1/4 teaspoon cayenne as my favorite. It makes a fairly spicy snack, but the honey balances it perfectly. Use less pepper for a tamer treat. A rounded half cup of kernels yields about 12 cups of popped corn. I always toss a little extra in the popper just to be sure, and am generally left with some to snack on while I cook. Depending on your popper, you might have to pop in two batches. This recipe is easily halved, but the full recipe is a nice amount when there are a few guests mingling about. It also stores for a week or so in an airtight container.

Honeyed Hot Pop

10-12 cups popped corn (popped in just a hint of oil)
butter for the bowl
1/2 cup honey
1 tablespoon water
1 tablespoon butter
1/2 teaspoon salt
1/4 teaspoon cayenne pepper (or less)

Rub a bowl large enough to hold the popped corn lightly with butter and add popped corn.

Heat the honey, water, butter, salt, and cayenne over medium heat in a small heavy sauce pan. Stir until everything is just combined and then let it come to a boil. Let the mixture boil without stirring for 2 minutes. Pour the hot syrup over the popcorn and stir to coat.

Line 2 heavy rimmed baking sheets with parchment and spread the popcorn between the two pans. Bake in a 300º F oven for 15 minutes, flipping and rotating the two pans halfway through. Remove from oven and let cool completely. The popcorn will crisp up as it cools.

carve-off twenty ten

My father took pumpkin carving seriously. From an early age, my brother and I were raised to give sincere contemplation to each year’s awaiting canvas. Sketches on paper, revisions if necessary – this was not something to be taken lightly. As we got older though, things started to get a little more competitive. Somewhere along the line “official judging” became an integral part of the process. My father frequently won. I remember the year he invited an outsider to judge – someone “impartial,” he said – wanting to claim his victory fair and square. And for a while, he had us, when his skinny oblong pumpkin with nothing but a single cyclops eyeball was crowned the winner. Only later did it slip that our guest was a minimalist architect – a fact that only our father was privy to.

He pulled plenty of other shenanigans – like disqualifying us for using “illegitimate” tools. He was a firm believer in carving with a standard chef’s knife. None of these fancy tools that come in pumpkin carving kits, no apple corer implements to make perfect circles, no x-acto knifes or special blades. My husband Mark is famous for the year he took his pumpkin out onto my parents’ front porch and, in an act of defiance, carved it up with his chainsaw. I think my father might have actually conceded the prize that year.

Yes – what started out as good old fashioned family pumpkin carving somehow became an institution that extended well beyond my youth. I even went so far as to send in my contenders via mail on the years I was far away from home. These days I carve in fond memory of my father, smiling with the knowledge that I am surely committing some violation that he can do nothing about.

On any given year, our garden usually yields about six to eight pumpkins. And even though there are only two of us, we seem compelled to carve every last one. We generally start a week or two before Halloween, and slowly stage a small welcoming committee outside the front door. And with the arrival of each new recruit comes a fresh bowl of seeds. I’m pretty sure that roasted pumpkin seeds would make my top 10 list of favorite things to eat.

Generally I soak them in a bowl of salt water – either over night or while we’re carving, depending on the timeframe. Then after draining them and drying them out a bit, I spread them on a baking sheet, drizzle some olive oil over them and add a hefty sprinkling of Penzey’s garlic salt before popping them in a low oven to roast for an hour or so until they are good and crunchy and nicely browned. Then, lookout. I have been known to eat an entire pan of seeds in one sitting. But last night, I decided to branch out. As I was rinsing the last of the pumpkin glop from the seeds, I happened to glance at a recipe for spiced pecans that I had clipped from the latest Bon Appétite to try, and I thought – why not? I tweaked it a bit – added some olive oil, reduced the sweet, and adjusted it to work with the seeds. The result was sort of a spicy pumpkin seed brittle. Very addictive, but a little more savory than my usual seeds. Which means I only ate about half of the pan in one sitting.


Spicy Pumpkin Seed Brittle

2 cups raw, cleaned, mostly dry, pumpkin seeds
1/3 cup honey
1 tablespoon olive oil
1 tablespoon sugar
1/4 – 1/2 teaspoon ground chipotle pepper

Heat the honey, oil, sugar and chili powder in a saucepan large enough to also hold the seeds. Warm the honey mixture, just until sugar and chipotle dissolve. Stir in the seeds, remove from heat, and stir well so all the seeds get nicely coated. Spread the seeds onto a baking sheet lined with parchment paper. Slow roast for about 2 hours in a 275º F oven, stirring every 30 minutes or so. When the seeds are done to your liking, remove from the oven and sprinkle with salt while still warm and sticky. As the seeds cool, they form a shinny brittle. After a few minutes, peel up the seeds with a spatula and roughly break them apart into a bowl. These would be great with pre-diner cocktails.


instapig

No Instagram images were found.