Archive for the 'pig slop' Category


potato amnesia

It happens every January. But still, it always catches me off guard and leaves me feeling bleak. The dreaded January thaw. One night of rain and our gorgeous snow base is diminished by half. One night of freezing temperatures turns our world into an awkward skating rink. A funk envelopes the house. My husband Mark mopes around and resolves to go biking with studded tires instead skiing on the trails. I stare out at the garden through the fog, searching for solace. It’s only a tease though. I know better.

Earl

The only member of the household who finds meaning in this gray bout of mucky of weather is our dog, Earl. He gets a reprieve from suiting up in full winter regalia before heading outdoors. And like magic he can smell the earth again. His walks take on new significance. He lingers over scents unknown to me, no longer anxious to sprint back to the warmth of the house. His nose goes into overdrive when he catches something in the wind. I try and let his delight trickle down to me.

I’ve been through this before, I tell myself. I know what to do. I queue up a few classic episodes of The Office – like the one where Dwight forms an alliance with Jim and stages a secret operation from a cardboard box, or when Ryan (the temp) starts a fire in the break room with his cheesy pita, or maybe for one final belly laugh, the episode where Andy Bernard does the splits in his dance routine and lands on his car keys. I’m smiling already.

Then I head to the kitchen, open a bottle of Sangiovese, and start rummaging. Potatoes, leeks, mushrooms, shallots, a little wedge of Gruyère, and a splash of cream. That’s right. It’s time for a gratin.

mushroom-leek-sauté

I’m pretty sure that January was made for gratins. When else can you get away with a layer of browned cream and nutty cheese atop your vegetables? Or rather, when can you get away with AND feel good about it even? During a January thaw. That’s when.

I put the gratin in to bake and call Mark to my home office to escape into a much more amusing office. And later, when our spoons break through that golden brown crust to the goodness below, we sigh and revel in momentary potato induced amnesia. What weather?

My plan is working. Maybe even too well. By the time I repurpose the leftovers with a fried egg on top a few mornings later, the thermometer has plummeted back into single digits. It’s still disastrously icy, but I feel a little bit better about the whole thing. Earl, on the other hand, is ready for spring.

potato-amnesia

Leek and Potato Gratiné
Inspired from Russ Parson’s How to Pick a Peach

1 tablespoon butter
4 medium leeks, tops removed, and thinly sliced
4 ounces mushrooms, chopped (a mix is nice like cremini and shiitake)
3 small shallots, thinly sliced
1 1/2 pound potatoes
2 ounces Gruyére, grated
1 1/4 cups vegetable or chicken broth
1/2 cup heavy cream
Salt, white pepper, nutmeg

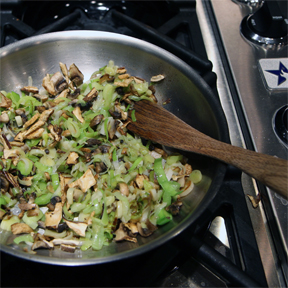
Saute the leeks in 1 tablespoon of butter over medium heat until softened, about 5 minutes. Add the mushrooms and shallots and reduce the heat to low. Cook for about another 5 minutes until the mushrooms begin to give off their moisture. Add a generous pinch of salt.

Slice the potatoes very thin – a mandolin makes quick work of this. I prefer my potatoes unpeeled, as long as the skin is relatively tender. Layer half of the potatoes in the bottom of a well buttered 8 1/2 x 11-inch casserole dish. Spread the leek and mushroom mixture over the potatoes, followed by half of the cheese. Give a sprinkle of salt over this if you’d like. Then layer on the remaining potatoes. Scatter the rest of the cheese over the top.

Gently heat the broth and carefully pour this over the potatoes so that the majority of the liquid rests under the potatoes and cheese. Drizzle the cream over the top and finnish with a grating of nutmeg and white pepper. Bake in a 400º F oven for 50-60 minutes until the top is thoroughly browned and the gratin looks compact. Serves about 6 as a side.

adventure-pup

looking back

Believe it or not, there is a special place in my kitchen for Pillsbury Pop n’ Fresh Biscuits. Normally I’m more of a “do it from scratch” sort of girl, but the Dough Boy has long held a spot in my heart. This most likely stems from early childhood, when I became very attached to the whole Pop n’ Fresh family.
This was in the 70’s – pre action figures. My Pop n’ Fresh toys are more like static rubber dolls, but the heads on all of the adults do spin. I have the whole Fresh clan. Grandpa Fresh, Grandma Fresh, Mrs. Fresh, Poppin and Poppie (the kids), BunBun (baby Fresh), Biscuit (the Fresh cat), Flapjack (the Fresh dog), and of course Pop n’ Fresh himself. I was especially taken with Biscuit. He went everywhere with me.
pop n fresh family
When I was about six my family took a trip to Sweden to trace my mother’s roots and visit long lost relatives. This was my first big trip and I packed carefully. I singled out Biscuit to keep me company on the long overseas flight. But after we were settled in our seats, I was dismayed to find my little cat was missing. Really the only thing I remember about my one and only trip to Sweden is the agony I felt over loosing my best companion. That and I got nipped in the stomach by a pony at some relative’s farm while trying to feed it an apple slice. It was a traumatic trip.
But my luck shifted upon arriving back to the States. It turned out that Biscuit had spent the entire trip to Sweden under the guest bed at my grandmother’s where I had slept the night before our flight out. And oh the relief to have the whole Fresh family reunited again! I think this incident is what really sealed my allegiance to Pillsbury.
That and my mom was good enough to fuel my love of being in the kitchen by supplying me with kid-friendly recipes. One of my signature dishes was weekend Sticky Buns – made with a tin of Pillsbury refrigerated biscuits. It was so thrilling to pop open the roll of biscuits. And the gooey warm buns that resulted were a treat to be sure. Gradually, I evolved in the kitchen and outgrew my Sticky Bun phase. But not without having made them often enough to commit the recipe to memory.
sticky buns
Several years ago, after what seemed like an arduous amount of time in the kitchen preparing fancy meals and copious holiday baking, I was racking my brain for something quick yet festive to ring in the new year with. Frankly the thought of my usual homemade cinnamon rolls for the first breakfast of the year felt like too much effort. And that’s when it hit me. Sticky Buns. Ten minutes to assemble, ten minutes to bake. Exactly what I was looking for. And they were even – a little to my astonishment – as good as I remembered.
For a slightly more grown up flare I switched from light corn syrup to honey and added a hint of vanilla. But beyond that, I’ve never looked back. A strong pot of coffee and a plate of Sticky Buns has become my New Year’s Day morning tradition. I look forward to it every year. Even though popping open the can of refrigerator biscuits still makes me jump.
When I was at my mom’s this Christmas, I asked if she remembered the binder of recipes she had assembled for me as a kid. Neither of us could recall what became of it, but she still had some of my favorites filed away. I felt like a ten year old all over again reading the stained, dog eared page. And I was surprised to realize that there are Sticky Bun variations. I’m a raisins only fan. But according to the recipe, Peter likes chocolate chips, Maggie likes raisins, and Katie prefers coconut and nuts mixed together. I don’t know who Peter, Maggie, and Katie are, but I am firmly in Maggie’s camp. And like the recipe says, they are “really good and really sticky!”
bun recipe
Sticky Buns

3 tablespoons butter
dark brown sugar
honey (or substitute light corn syrup)
raisins (and/or chopped nuts, toasted coconut, chocolate chips)
vanilla (optional)
1 can (8 ounces) refrigerated biscuits

Cut each square tablespoon of butter into quarters. Take two of the pieces and grease 10 cups in a standard muffin tin. Take the other 10 pieces and put 1 in each of the 10 muffin cups. Add 1 teaspoon of brown sugar and 1 teaspoon honey to each cup. For a little extra flavor you can also add 5 to 6 drops of pure vanilla in each cup.  Sprinkle a few raisins in each cup (or if you want to branch out like Peter and Katie, add any combination of coconut, chocolate chips, and nuts). Pop open the can of biscuits and put 1 on top of each cup. Bake the Sticky Buns in a 400ºF oven 8 to 10 minutes, until the biscuits are gently browned. Run a knife around each bun. Then put a cookie sheet or tray over the muffin pan and invert the whole shebang. Give the bottom of each cup a tap with the base of the knife, wait about 2 minutes and lift up the muffin pan. Gently pry out any stuck buns with the knife. Makes 10 buns.
biscuit

somethin’ extra

Ah. I love Christmas cookie season. I typically start thumbing through magazines and cookbooks sometime in mid-November in anticipation. I have my usual standbys, but I always like to try a few new ones too. And every once and a while one will shine through, upgrading it’s status from trial to permanent.

mittens

I seem to be especially taken with cut-out sugar cookies. I have sort of a sick habit of using the tiniest cookie cutters I can find and then spending an inordinate amount of time decorating them. December can be a ridiculously busy month. But despite everything there is to do, somehow I find it very therapeutic to sit and put little carrot noses and itty-bitty buttons on a plate of one inch tall snowmen. I especially like doing this late at night, when the house is dark and quiet with only the glow of the tree and a glass of wine to keep me company.

cut-out cookies

To facilitate my cut-out cookie fetish, I have orchestrated scads of sugar cookie trials. But a few years back, I finally quit. None of them ever made the jump to permanent. The reason, I finally concluded, is that nothing can top my Great Aunt Mabel’s sugar cookies. These cookies have to be one of the first things I ever baked, and certainly one of the first “real” recipes I ever copied down into my now overstuffed binder. They are buttery, flaky, and just sweet enough.

But there is something else that sets them apart. Something that I didn’t realize was unusual until I really started baking. The dough gets a shot of vinegar. And this, I believe, is why in blind taste test after blind taste test, I always pick Mabel’s cookie. It just has a little somethin’ extra. I sure wish she was still here to ask “why the vinegar Mabel?!” It no doubt reacts with the tiny bit of soda, eliminating the need for baking powder, but still, I’d love to hear her take on it. That’s Mabel, below on the left, with her sister-in-law (my grandma) Myrtle (the table setting diva). Have you ever seen two women so happy over a bowl of mashed potatoes?

sisters

Mabel’s recipe is the traditional, flatten with a glass sort of sugar cookie, but many years ago I started using it for cut-outs too. In either rendition, it’s a lovely cookie. And as far as cut-out are concerned, I don’t limit myself to the Christmas season. In my book any holiday is reason enough for cut-out cookies – valentine hearts, easter eggs and spring chickens, four leaf clovers, canoes and sailboats, witches, even turkeys – I don’t discriminate. But in the off-times, a plain old, glass-flattened sugar cookie and a stiff cup of afternoon tea can certainly do no harm.

Great Aunt Mabel’s Sugar Cookies

1 cup sugar
1 cup butter
(the original recipe of course calls for shortening, which was very vogue in the day – use whatever combination of butter and/or shortening you’d like)

Cream together. Then add and mix in:

1 egg
2 tablespoons vinegar
1 teaspoon vanilla OR almond extract

Sift together and add:

2 1/2 cups flour
1/2 teaspoon baking soda
1 teaspoon salt

Form into balls. Press flat with a glass dipped in sugar. Bake in a 350º F oven for about 10 minutes, until just barely golden.

* For cut-out cookies:  After the dough is mixed, divide into 3 rounds. Flatten each disc between 2 large piece of parchment. Roll the dough through the parchment until it is an even 1/8″ thick. Chill the rolled out sheets for about three hours. Once chilled, peel off the top sheet of parchment from one packet at a time and cut out shapes. Use a small spatula to transfer cut-outs to a baking sheet. Cold dough is your best friend! Keep the other sheets chilled until ready to use. If the sheet you’re working on starts to become unruly – stick it back in the fridge or freezer for a quick chill and then resume cutting out. Save the scrap piles from each sheet and re-roll between parchment, chill, and cut again. This dough is pretty easy to work with as long as it is chilled. If you don’t have the patience to periodically re-chill it, you can add up to an additional 1/2 cup of flour during the original mixing. This will help the dough be a little more forgiving.

Smaller cookies take less time to bake. Watch carefully – the bottoms should be light golden, with almost no color on the tops! Once cooled, frost (or, sprinkle cookies with decorative sugar before baking)

Glossy Frosting

1 cup powdered sugar
1 egg white

beat well with electric mixer. Add:

1/2 teaspoon cream of tartar

Beat again. This makes about one cup. I usually make 2-3 batches, divide  into small bowls and stir in a teeny bit of coloring to the bowls. Let the frosting harden before storing finished cookies in an airtight container.

cooling cookies

hidden gems

When I was a kid of about ten or eleven, I knew something that my cousins didn’t. I knew that my Grandma Myrtle would often set her fancy holiday table days before the actual event. I was privy to this insider information because out of nine grandkids, my brother and I were the only two who came from out of town. So unlike our cousins, we’d generally arrive at Grandma’s house a few days prior to any holiday. And almost always, we’d race in to find the table expanded to full capacity and set with her fine china. I always thought this was funny and sort of strange. Didn’t she have anything better to do, I wondered?

Well. Bite my tongue. Having just hosted my first ever, full blown Thanksgiving – I’m here to tell you that it turns out Grandma did have something better to do. Like maybe the prep work for a big ol’ roast turkey, a half dozen sides, and a couple of deserts. Oh, and she might have spent some time tidying the house and making sure there were clean sheets for the company. I wasn’t far into my own holiday preparations before I decided to take a page from Myrtle’s book and get the table set. Clearly she was onto something.
thanksgiving table
My table wasn’t as fancy as Grandma’s, but it got the job done. Butcher paper and crayons stood in for a long table cloth that I don’t own. Simple fall fruits and pinecones took the place of a flower arrangement. And my Grandma Marjorie’s china got a long-awaited reviaval. When my two nieces burst into my kitchen on Wednesday, I chuckled and gave a nod to Myrtle after they realized the table wasn’t set for that night’s meal. “Wait,” one of them asked incredulously, “This is for tomorrow?” I assured them that someday they’d understand. And then I told them about their great Grandma Myrtle.
Overall my inaugural Thanksgiving hosting went pretty well. My family was very forgiving of all my racing around. And they didn’t even mention that flash freezing my Parker House rolls after their final rise didn’t exactly work. There were a few things I would do differently in the kitchen next time, but by in large, it was a perfect holiday. There was good old-fashioned charades, custom made word-finds, and scavenger hunts. We even managed to get out and run the Chequamgon Bay 5k Turkey Trot on Thanksgiving morning.
We did, of course, find plenty of time to eat between all these activities. On the food front, I’d say there were two hidden gems. One was the surprise “banana tower” that my niece Evie constructed for us the morning after our big feast. It is as straightforward as it sounds – a raging tower of banana pieces. But we all agreed that the bananas were perfectly ripe. And plucking them off the tower one by one was especially gratifying.
Evie
The other star was a simple appetizer that really held its own, even against our succulent heritage turkey with bacon-herb butter stuffed under it’s skin. Keeping with the bacon theme, I knew I wanted to do a bacon wrapped something for a pre-meal tidbit. For the kids I decided I couldn’t go wrong with pineapple chunks wrapped in bacon. And for the adults, I found an old Gourmet recipe that fit what I was after perfectly. Bacon wrapped Parmesan-stuffed dates. Each bite offers a mini explosion of smokey, salty, and sweet. They’re satisfying without being overly rich and pair nicely with a glass of wine. And they are a cinch to make. On a whim I gave both the kid and adult versions a light drizzle of honey before popping them in the oven. Because what isn’t made better by a light drizzle of honey? Hope you all had a holiday that was sweet and cozy.
stuffed date
Bacon Wrapped Parmesan-Stuffed Dates
(Adapted from Gourmet)

12 Medjool dates
12 matchstick size pieces of Parmesan (about 1-inch by 1/8-inch)
4 bacon slices, raw – cut into thirds
Honey

Make a slit in each date with a paring knife and remove the pit. Stuff one piece of cheese into each date through the same slit. Wrap each date with a third piece of bacon, covering the slit, and securing with a toothpick. Arrange assembled dates on a baking sheet and drizzle very lightly with honey. Bake in a 425º F oven for 10-15 minutes, or until the bacon is crisp. Drain on a paper towel and serve warm. Serves about 6.

turkey sketch

constant vigilance

When my dad unexpectedly died eight years ago, he left me with a lifetime of memories and a handful of his possessions. Probably the most treasured of his things are the dozen or so carefully chosen books that now reside on my shelves. My dad was a big underliner. I love that glimpse into his brain when I stumble across passages that intrigued him.
The garish orange jacket that I incessantly tried stealing from him as a teenager now hangs in my closet legitimately. The thrill is gone and it truly is an ugly jacket. But that hardly seems to matter. I still wear it.
pals eyeglasses
I have his first pair of eye glasses as a kid. They are in a little hard case with two black and white puppies on it. You can tell that at one point the dogs were fuzzy. In small silver script between the dogs is the word “Pals.” My father and I had a lot in common, but our terribly bad eye sight was a bond that ran deep. I keep his glasses along with my first pair of glasses in an old coffee cup that he and I traded back and forth as a joke for years.
The jar of marbles that he used as slingshot ammunition to scare the crows and deer from his tart cherry orchard sits on my desk. Lucky for the wildlife population he was a lousy aim. I declined to take the actual slingshot, because his jar of colorful marbles is all I need to recall his pluck and persistence.
And I also inherited some living things. Shortly before he died, a hazelnut farmer from southeast Minnesota had arranged to send my dad a half dozen hazelnut shrubs as a gift the following spring. My mom told me she would have them sent to me instead. I had all but forgotten about it, until an oversized envelope arrived the next spring with six bare little wisps. It actually took me a minute to figure out what they were.
hazelnut-bush
I headed out with my hazelnut sticks on a windy spring day, and for lack of a plan, stuck them in a temporary nursery bed in the garden. In the seven years since, they have been transplanted more often than any living thing deserves. I finally realized it was time to quit moving them when I had to hire a high school kid for the heavy digging and lifting.
But after all these years of putting up with my shenanigans, the bushes bore their first respectable hazelnut crop. I knew something was up when I started noticing a gang of bluejays congregating on the garden fence. And it didn’t take long to see them them flying away with fat nuts in their beaks. “Hey!” I would run out, shaking my dad’s jar of marbles at them. It was a pretty good defense really. More often than not the jays dropped their prey, leaving me to finger through the grass for the treasure.
hazelnut-harvest
With constant vigilance, I slowly amassed a small basket of nuts. I’ve never grown any sort of nut before and it all felt quite exotic. Hazelnuts grow in clusters of three or four and are protected by fancy outer coats. The nuts are ready to harvest when the husks turn brown – or when they are dropped from the mouths of bluejays. Whichever comes first. I brought my small harvest in to cure and started dreaming about what I would make.
By the time I got the husks and hard shells removed I was left with just under a cup of raw nuts. Not a bumper crop, but still worthy of something. I decided on a teeny-tiny tart. My dad liked to think that he was the type of person to decline dessert, but in all honesty, he could not resist a simple, rustic sweet. So in his honor I made a brown-butter, honey hazelnut tart topped with sea salt. He might have said he that he’d pass, but I know better. He’d be right at my side, dipping his spoon into that caramelized goodness, again and again.
teeny-tiny-tart

Brown-Butter Hazelnut Tart for Two
Adapted from Food & Wine

Tart Shell
(Makes enough for an 11″ tart. I used half the dough and froze the second round for another teeny-tiny tart down the road)

1 stick butter, room temperature
1/4 cup sugar
1 small egg
1/4 teaspoon vanilla
1 cup plus 6 tablespoons flour

Beat the butter and sugar in a medium bowl until creamy. Beat in egg and vanilla. Stir in the flour until just combined. Shape the dough into a ball. Flatten the ball into a one disk for a full size tart, or divide in half for two smaller 5-6 inch tarts, Wrap in plastic and refrigerate for at least one hour.

After the dough is chilled, roll it out on a floured surface to fit your tart pan. Press into pan and trim edges as necessary. Return the pan to the refrigerator and chill for 30 minutes to firm up the dough. Line the tart shell with parchment or foil and fill it with pie wights or beans. Blind bake the pastry on the bottom rack of a 350º F oven for 15 minutes. Remove the parchment and weights and bake for another 10-15 minutes until golden. remove from oven and let cool.

Filling
(Makes enough for one 5-6 inch tart. Double for a full 11 inch tart)

4 ounces shelled hazelnut, roughly chopped (*see note)
1 tablespoon butter
2 eggs
1 egg yolk
6 tablespoons sugar
1/4 cup honey
1 tablespoon cider vinegar
1/2 teaspoon vanilla
pinch of salt
coarse sea salt for topping
Crème fraîche (or lightly whipped cream) for serving

Toast the hazelnuts in a 350º F oven 10 – 15 minutes until golden brown. Let cool.

Heat the butter in a small sauce pan over medium heat for one to two minutes until nutty and golden brown.

In a small bowl, whisk together the eggs, egg yolk, and sugar. Whisk in the honey, vinegar, brown-butter, vanilla, and salt. Stir in hazelnuts. Pour filling over pre-baked tart shell. Return to the lower oven rack and bake for 20 – 30 minutes (depending on the size of your tart). In the last half of baking, sprinkle tart with coarse sea salt.

*A word on hazelnut skins. My crop had tender, pale skins, unlike the dark brown skins found on most hazelnuts. I’m not sure if this is due to freshness, or size of nut, or variety, but either way, I did not bother peeling off this outer skin – as is often recommended. A good method for this, however, is to boil 2 cups of water with 3 tablespoons of baking soda added. Add a cup of nuts and boil just briefly until the water turns black. Drain the nuts and rinse with cool water. The skins will rub right off. Blot them dry and proceed with toasting.

fresh nuts

good deed

I’m trying to keep my chin up, but every time I go out to work in the garlic patch I wind up feeling gloomy. It’s the uncertainty of my seed stock and the scare of Phytoplasma infected seed that’s getting me down. One minute I think I was ruthless in my culling. But the next moment I’m questioning if I should be planting any of it. It feels risky, but for now I am forging on and planting the little bit of seed that I think is safe. I plan on making heavy use of floating row covers next spring to keep any potentially infected plants isolated from the leaf hoppers that transmit the bacteria.
I’ve been in e-mail contact with a handful of garlic growers and the disease is eerily widespread across the midwest – even as far south as Missouri. Current thinking is that the mild winter coupled with a hot spring and early leaf hopper migration are to blame. The warm spring caused the garlic to sprout earlier than normal. Leaf hoppers don’t actually prefer to feed on garlic foilage, but this year it was one of the few food sources available to them upon their early arrival in the north.
It’s easy enough as it is for me to get pretty wound up about our country’s whacky food and agricultural systems and climate-induced outbreaks like this one only compound my fears. But if nothing else, it is a good reminder of how vitally important small backyard gardens are. Diversity, friends! It’s on our side. A wise approach to apply to all aspects of life, really.
On that note, if you have a few healthy heads of garlic lolling around your pantry, I beg you to take them out back and plant them. It’s an easy good deed, I promise. And it’s a good investment. Garlic might be in hot demand. Just break apart each head into individual cloves and plunge them into some fluffed up soil – flat (root) end down, pointy tip up, an inch or two deep. Give about 6 to 8 inches of space between each clove. Add a hefty blanket of mulch – straw ideally, leaves in a pinch – and you’re all set, you’ve done your part. Garlic pigs nation wide will thank you.
And, if like me, you have any so-so looking garlic sitting about, I have a solution for that as well. We’ll just use that up quick in a garlic infused hot chile paste. Oh fine, if you insist, you can save out one of your healthy looking heads of garlic to use instead. I’ll just look the other way – this sauce is worth it. It’s so good that it has jockeyed for front position in the condiment door of the fridge – sending the big bottle of Sriracha to the back. In my house, that’s sayin’ something.
I was introduced to this knock-out hot sauce a few years ago when my friends Bob and Reba came to dinner bearing a jar of it. It was a perfect condiment for the large platter of Indonesian gado-gado I had made. Fiery, but tangy with just a hint of sweet. Later, Bob assured me it’s the perfect condiment for almost everything. Stir-fries, beans, eggs, even – he claims – peanut butter sandwiches. And he’s right. It’s built on a flavor combination that makes you crave more, in spite of the heat.
After I ate through my first jar, Bob and Reba graciously set me up with two more – and the recipe. As it turns out, it’s a recipe from a cookbook that has been sitting on my shelf for years – Sundays at Moosewood Restaurant. The book is a favorite, but it’s thick, and evidently I have not discovered all of it’s gems. I love it when that happens. The book is a collective of 18 different authors, each one focusing on a particular ethnic cuisine. The chile paste – Sambal Bajag – hails from Southeast Asia.
Towards the end of each garden season, I round up the last of the tomatoes and hot peppers for a octuple batch (that’s eightfold, and yes, I had to look up the proper term.) This generally yields about five 1/2 pint pressure canned jars to stick in the pantry.  What follows is the single recipe which makes a healthy 1/3 cup of sauce. This will keep in the fridge for a good long while. Which is nice, because a little dab goes a long way. You can use any combination of finely chopped hot peppers – fresh, dried, or plain old pepper flakes. I typically use a mix of tiny dried Bird’s Eye and semi-dried Ho Chi Minh from the garden. Whatever you do, be bold! Don’t  skimp! As the recipe notes, “If it’s not hot, it’s not right.”

Sambal Bajag
Adapted from Sundays at Moosewood

3 tablespoons oil
1/4 cup minced onion
2-3 tablespoons minced garlic
4-6 teaspoons well minced or crushed hot peppers (dried red chilies, pepper flakes, or fresh)
1/3 – 1/2 cup finely minced tomato
1 teaspoon kosher salt
2 teaspoons honey
2 teaspoons dark molasses

In a heavy frying pan or wok, heat the oil and stir-fry the onions and garlic. after a minute or so, add the hot peppers. Reduce heat and stir constantly so they do not burn. As soon as the peppers darken a little, add the remaining ingredients. Simmer the sambal on very low heat until most of the moisture has evaporated and the oil gradually returns to the surface – about 20 minutes. By this point the sauce should be so well cooked that you can’t really detect the tomatoes. Store in refrigerator. Makes about 1/3 cup.

bad situation

It’s time to get back to the business at hand here. We’re way over due for a garlic talk. The honeybee drama has sort of hogged the stage lately. Truth be told though, I’m having as much trouble with the garlic as I’ve has with the bees. And I’m sort of in denial about it. If nothing else, the bees have been providing a nice distraction.
I’ll cut right to the chase. In my 18 years of growing garlic, I have never had things go quite so wrong. Sure, I’ve harvested some varieties way too late, mislabeled others, and have even had some surface mold issues. But this – this is something all together different. Everything was smooth sailing, right up until about a week before harvest. Almost overnight though, my generally healthy looking garlic plot turned yellow and crunchy. Nearly every single plant, of every single variety. This is when the denial started. We’re in sort of a drought, I rationalized. It’s natural for things to dry up and get crispy, right?
garlic decline
I bumped up my harvest schedule and started pulling varieties as fast as I could. Things didn’t look too bad, but the plants just didn’t seem right. The average head size was maybe a tad smaller than normal, but overall the heads seemed firm. The curing shed gradually filled up and looked like it looks every fall, but I left it hanging to dry with sort of queazy feeling in my stomach.
I decided that the best I could do at this point was a some research. I learned, rather shockingly, that much of the garlic crop in the midwest has been affected by a bacteria called Phytoplasma. Yellowing leaves and premature browning is a key symptom. Many growers in Iowa, Wisconsin, and Minnesota are reporting up to 100% crop loss. Gulp.
The bacteria (which are tricky to detect due to their lack of a cell wall) appear to be spread from plant to plant by leafhoppers. Phytoplasma seriously affected garlic production in Edmonton, Canada 13 years ago, and in Cordoba, Argentina 15 years ago. One scientific paper I read out of Argentina refers to the disease repeatedly as ‘Tristeza del ajo’ or ‘the garlic decline.’ How sad is that? Evidentially many Midwestern crops, flowers, and vegetables have been infected by Phytoplasma disease this year.
If there is any good news in all this, it’s that the bacteria affects only the growing parts of the plant and does not infect the soil or move through the air. The bad news though, and it’s bad, is that Phytoplasma will likely overwinter in infected bulbs and the disease will carry over into the next year’s crop. This means, of course, that it is not a good idea to plant infected seed. See why I’m in still in denial? I’m one sad little garlic pig.
garlic in wiaitng
I have just a wee bit of what appears to be non-infected, normal seed. But even the thought of planting that makes me nervous. And I have quite a lot of infected bulbs. They also make me nervous. Once you get past peeling away their unnaturally ruddy-brown papers, the cloves are normal and safe to eat, but something tells me they may not store very well. Consequently we’ve been eating a lot of garlic intensive meals this fall. I’m doing my best to make the most of a bad situation.
Serving up Yotam Ottolenhi’s Caramelized Garlic Tart has certainly helped. I’m pretty sure I could eat this endlessly. Which is good, because I might have to in order to get through all of my declining garlic. Pair it with a simple green salad for a fantastic dinner. Or serve it up for brunch. Either way, get ready for a heavenly mix of savory cheeses and sweet caramelized garlic. It is simply delicious. And it’s bound to ease some troubles – garlic or otherwise.
garlic tart

Caramelized Garlic Tart
Adapted from Yotam Ottolenghi’s Plenty

1 sheet (8 1/2 oz) puff pastry
3 heads of garlic (3-4 ounces total), separted and peeled
1 tablespoon olive oil
2 teaspoons balsamic vinegar
1 scant cup water
2 teaspoons sugar
1 tsp fresh thyme, chopped
1 teaspoon fresh rosemary, chopped
4 oz soft goat cheese (chev)
4 oz gruyere, shredded (or any similar hard cheese)
2 eggs
1/3 cup cream or half and half
1/3 cup crème fraîche
salt and pepper, to taste

Use a 9 1/2 to 10 inch tart pan with a removable bottom for this recipe. It makes serving it a dream.

Roll out the puff pastry so it will fill the bottom and line the sides of the tart pan. Transfer to pan and trim any excess. Cut a circle of parchment the diameter of the pan and lay over the pastry. Fill up with baking beans of pie beads and refrigerate for 20 minutes.

Blind bake the pastry shell in a 350ºF oven for 20 minutes. The beans or weights keep the pastry from puffing – leaving room for the filling. Remove the beans and bake for an additional 10 minutes until golden. Once done, set aside to cool.

While the pastry shell bakes, caramelize the garlic. Put the cloves in a small saucepan and add enough water to cover entirely. Bring to a boil and blanch for 3 minutes. Drain and dry the garlic. Return the pan to the heat, add oil and fry the garlic cloves in it over medium heat for a couple of minutes. Add the balsamic vinegar and water and bring it to a boil. Turn down the heat, and let it simmer for another 15 – 20 minutes until most of the liquid has evaporated and the garlic is coated in a lucious glaze. Set aside.

Whisk together the eggs, cream, crème fraîche, salt and pepper in a bowl.

To assemble the tart, scatter the baked pastry shell with both cheese. Sppon the garlic and its syrup over the cheese. Pour the egg and cream mixture over the top. Reduce the oven to 300ºF and bake for 30 – 45 minutes, until the tart is set and nicely golden brown. Garnish with thyme sprigs. Serves 8.

pie beans

season finale

Every once and awhile keeping honeybees feels like a chore. There are times when I just don’t feel like running out to the hives to do a mite count or to check that the fence is still working after an electrical storm. And there are days when the weather doesn’t cooperate with my schedule, forcing me to readjust – or worse – to rush. But really, those times are few and far between. The reality is that beekeeping provides me with a perfect excuse to take a long lunch, or better yet, to cut out of the office a couple hours early and spend the rest of the day outside.

fall colors
I’ve noticed that the urge to impulsively go visit the bees seems to increase with the diminishing day length. Perhaps it’s because I feel the cold breath of winter lurking on the horizon. Certainly the stunning fall landscape might have something to do with it. Or maybe it’s just a plain old love affair with bees. Whatever the reason, I don’t fight it. Last week I headed out to the beeyard for a quick task and found myself lingering. I decided to have “just one more look” in my queenless hive “just in case.”
I pulled a frame from the outer edge, not expecting to find much. I was just about to set it aside for another frame when I saw her. A queen. A petite queen, but undeniably a queen. Here is where I can’t decide if the world sped up, or went into slow motion. Before her presence could even fully register in my brain, I watched as she zipped off the frame and flew away, high into the sky. It’s a good thing I was wearing a veil, because I’m pretty sure I just stood there with my mouth open, dumbfounded, for a good minute. A rogue bee flying into my mouth would have only clouded the situation.
I pulled myself together and, of course, immediately started second guessing what I had seen. It couldn’t have been the queen, I told myself. I must have just imagined her, out of sheer hopefulness. I made her up, I was sure of it.
But I didn’t. A queen can be tricky to spot, but when you see her, you know. There is no maybe about it. I saw the queen I had been hoping to find for weeks just a clearly as I saw her fly away.
honey jars
It doesn’t happen often, but it is possible when working with a hive that the queen will accidentally get out. I remember one occasion after a particularly rigorous hive check, I had everything put back together, ready to head for home when I happened to look down and see the queen sitting on the front porch of the hive, looking disorriented and maybe even a little miffed. I begged her pardon as I scooped her up and led her back into the safety of the hive. If you actually see the queen unintentionally fly from the hive, I’ve heard it is best to stand right where you are for 10 to 15 minutes and wait. The idea being that the queen has hopefully sighted you as she left and will use you as a guide to return.
So I stood. And I stood some more. I may have been standing still, but my brain was not. Was this new queen just waiting around for the exact right moment to depart on her mating flight? A moment which I had just indadvertedly created? Or had she already been on her mating flight but not really settled back in? Did I spook her out? Had I just undone a summer’s worth of effort from the hive to raise a new queen? And was that really the queen I saw?
Humph. That perfect golden afternoon light that drew me out to the hives in the first place was starting to fade. I put the hive back together and sent as many good thoughts as I could think out to the fly-away queen. Wherever she was. I drove home, wondering how the season finale would write itself. Would it be a gripping cliffhanger? A storybook ending? Hopefully not a tearjerker. It’s certainly been a roller coaster ride this summer – full of anticipation and thrills. And let me tell you, it’s been encourging to have so many people along for the adventure.
Don’t worry, I’m not going to leave you just dangling up there at the top of the ride. I couldn’t. Because I’d burst if I had to wait all winter to tell you that the hive is now home to Queen Freeda’s magnificent daughter. That’s right! The petite little queen made it back to the hive. I know, because this week, I saw her, plain as day, no maybe about it. And I found cell after cell of perfectly laid eggs. At this late in the game, I may need to borrow a few bits and pieces from other hives to make sure they have a fair shake at surviving the winter. But if their perseverance thus far is any indication, I’m not too worried. Those girls are troopers.
After a summer of meddling and fussing and worry, I finally have a daughter of my all-time favorite queen.This called for cake. But not just any cake. I wanted a simple, sturdy cake. One I could wrap up in a piece of waxed paper and head out to the beeyard with. Honey, of course, should be the star.
honey cake
The recipe sort of formed from what I happened to have on hand. But after enjoying several pieces, I’ll make it a point to have these ingredients on hand again – it was just the combination flavors I was looking for. I intentionally used half spelt flour, because it adds a subtle sweetness to a not overly sweet cake. And I have to admit that I am drawn to cakes that go just as well with a late afternoon espresso as they do with a smear of butter for breakfast. This is that cake. Oh, and it tastes especially lovely outside on a fall day – with or without some bees to enjoy it with.
Honey Cake
Adapted from Tom Herschfeld

1 cup spelt flour
1 cup unbleached flour
1 1/2 teaspoons baking soda
1 teaspoon cinnamon
3/4 teaspoon cardamom
1/2 teaspoon salt
1/2 cup honey
2 large eggs
1/4 cup plain greek yogurt
1/4 cup melted butter
1/2 cup half and half or milk
1 cup dried blueberries

Sift dry ingredients together into a mixing bowl. In a another bowl, whisk together honey, eggs, yogurt, butter, and half and half. Stir wet ingredients into dry with a wooden spoon. Gently fold in blueberries.
Spoon batter into a well greased 8×8 baking pan.
Bake at 350º F for 30 minutes, or until a toothpick comes out clean.
honey cake

tomato heaven

I picked the last two ears of sweet corn form the garden last night. They weren’t quite as tender and sweet as the ears from the height of the season, but I’m not complaining. I got them down just fine. And even though I am just the teeniest, tiniest bit tired of tomato sandwiches, I keep right on eating them. As many as I possibly can. Because pretty soon there won’t be any tomato sandwiches. And I know it will be a very long wait until the next one.
sweet corn
I’m getting pretty good at waiting though. My bees have given me plenty of practice lately. That’s right, nine weeks out, and I am STILL waiting to find out if I have a new queen in the mystery hive. The only thing I know for certain is that Freeda’s girls are really putting my patience to the test. The laying workers and/or ill-mated queen that were busy at work a few weeks ago are no longer laying. At last check there was a complete absence of any type brood. I’m still hanging on to a thread of hope that a new queen has hatched and has merely been out and about, taking her sweet time to get settled in. But if there are no new eggs when I check in a few days, I will most likely reunite the queenless hive with the original Queen Freeda and her gang.
After what we’ve been through, all I can do is laugh at the prospect of backtracking and putting them back together as one. But that’s okay. If that’s the case, they will go into winter as a big, strong colony that will most likely be ready to split in the spring. Which means I’ll get to try and do it all over again! I wish I could say with confidence that I’ll have more experience under my belt next time, but I’ve kept bees long enough to know that experience only takes you half way. The rest is a funny combination of great mystery and dumb luck. I respect that.
freeda's hive
The girls have certainly kept me on my toes the past two months. I probably have a little less honey to show for my nine weeks of effort, but it’s a good reminder that I didn’t get into beekeeping so much for the honey harvest as I did just to have some bees to visit with. I’ve spent my fair share of time at the beeyard this summer, and my take-home message for the season is “wait please, be patient.” Pretty good advice, really. And despite everything, there is still plenty of honey to see both me and my bees through the long winter.
Lucky for me, I’ve also got a stockpile of tomatoes. Canned, salsa-ed, slow-roasted, and sauced. It’s nice to watch the pantry and freezer filling up.  On the rare day when I have had one too many tomato sandwiches, I put my tomatoes to work in a 3-ingredient sauce for a fantastically simple dinner. I stumbled across Marcella Hazan’s recipe last summer at Food 52. A find that inadvertently ended my search for the perfect tomato sauce. I don’t see any reason to ever make another sauce. Ever. This is pure, lick your plate, tomato heaven. Although, I did just read about an older, James Beard version of the same sauce that uses garlic instead of onion. I admit that’s a rendition worthy of a try.
I almost always make a double batch of sauce. Whatever doesn’t get slurped up for dinner gets put into the freezer for a cold January night. Having a dozen or so pints tucked away really takes the edge off of waiting for tomato sandwich season. Just as a slather of fresh comb honey on warm toast bolsters my patience for the bees.
tomatoes
Marcella Hazan’s Tomato Sauce with Onion and Butter

2 pounds fresh, juicy, ripe tomatoes
1 onion, skinned and cut in half
5 tablespoons butter
salt to taste

Blanch the tomatoes in a pot of boiling water for one minute. Drain, cool, and slip the sinks off.

Coarsely chop the tomatoes into a sauce pan. Add the butter, onion, and a big pinch or two of salt. Cook uncovered at a very slow, but steady simmer for about 45 minutes, or until it is thickened to your liking and the fat floats free from the tomato. Stir occasionally and mash up tomatoes as they cook with the back of a spoon. Taste and correct for salt. Discard the onion before tossing with pasta. Serve with freshly grated parmesan cheese for the table. Dresses 1 to 1/12 pounds pasta. Freezes well.

pasta and sauce

stiff competition

I have a dark and dirty secret. It involves the Minnesota State Fair. And a green bean. Before I spill my guts though, I need to rationalize by explaining that I grew up with the fair. It’s in my blood. Even though I’ve been a Wisconsin resident for eleven years, I still make it a point to visit the Great Minnesota Get Together every August.

The amount of things to do, see, and eat is thrillingly overwhelming. But my hands down favorite hangout is the Ag-Hort-Bee building. There you will find giant pumpkins the size of small cars, honey bee demonstrations, and honey ice-cream. You can get composting advice, watch the Ginsu Knife dealer put on an amusing show, and catch a straw bale gardening demo. There is certifiably crazy crop art and gorgeous displays of perfectly shaped vegetables lined up on neat styrofoam trays. And if that isn’t enough, there is the longest green bean competition.

crop art kitty

Every year I marvel at these extraordinarily long beans. So much so that one year, I got the bright idea that maybe I too should try my hand at growing a long bean. I returned home that August brimming with excitement. I did my seed research over the winter months and decided on two varieties – Red Noodle Yard Long and Asparagus Yard Long. I dutifully scoured the rules and regulation handbook for mention of a state residency requirement. Finding none, I enthusiastically sent in my registration, Wisconsin postmark and all. They sent back my entry materials – no question or mention of what state I resided in. All systems go.

The following spring I was so anxious that I even started some beans indoors. No one starts beans indoors. The fact that they don’t really care for transplanting didn’t deter me. I had my eyes on the prize. I spent the summer coddling my plants and sending regular updates to my gardening mentor and self-appointed bean coach, Lorna, in northern Maine. When Mark and I left for the Boundary Waters for a week I put signage around the bean poles so the cat sitter wouldn’t inadvertently pick any contenders. With only a week to go, my longest bean was just shy of 25 inches.

Only then, as I was double checking my complimentary parking pass, did I stumbled across something in the entry materials very clearly stating that all competitors must be from Minnesota and that any competing vegetables must be grown in Minnesota soil. I was sunk.
long green bean

I paced around the garden. Surely I did not have a climate advantage over anywhere in Minnesota. If anything, the cool Lake Superior spring is a growing disadvantage. I couldn’t help myself. I called my brother in Minneapolis. He has a small garden. There must be some green beans growing in it. I explained the situation and pleaded for him to go in cahoots with me. His name, my bean. I think he agreed only because he thought there was substantial prize money on the line. In truth it was merely a $10 purse. I promised that his name wouldn’t be muddied by the press. And then I did it. I sent in a last minute registration in my brother’s name.

I resumed nervously pacing the garden. My bean, or rather my “brother’s bean” was due for judging at 7:30 am on the opening morning of the fair. I picked my 2 best contenders the day before the fair and laid them out in an oversized cooler on ice. Mark and I headed south. When we reached the border I called my brother to let him know the illicit bean had crossed state lines. We talked over the next morning’s logistics. It occurred to me that I was asking my already overly busy brother to drive across the city in rush hour traffic for a green bean.
I looked over at Mark. I suggested that perhaps, maybe, if he wouldn’t mind, he could stand in for my brother? Then I reminded him of our marriage vows. In sickness and in health, we are a TEAM baby, ’til death do us part. Nothing. I offered up a third of the prize money. Mark countered by asking if they check ID. Probably not, I assured him.
All I can say is that it was a good thing Mark was driving the next morning, because I was a jittery wreck. Mark gallantly led me and my bean to the vegetable staging area and told me to wait in the corner while he went to register. As I was standing in the shadows, sweating bullets, an old-timer waltzed by me with a bean clearly longer than mine. “Nice bean,” I muttered. We met again, post-judging, at the competition table. His bean hadn’t won either. We agreed that it was stiff competition. I was sadly relieved. The blue ribbon would have only saddled me with guilt.
green beans
My garden still offers several varieties of green beans, but I haven’t had the gumption to try long beans since my illegitimate attempt. I play it safe and stick to slender haricots and the occasional pole bean. What has changed, however, is the way I serve beans. I used to just dress them in a bit of butter with a dash of salt and pepper. But now, because I know the daring side of green beans, I sauce them up with a simple homemade Sriracha butter. It’s zingy, bold, and thrilling – just the way a green bean likes it.
green beans
Sriracha Butter Green Beans

1 pound green beans (bush, pole, or if you’re feeling really daring – yard longs)
3 tablespoons butter
1 tablespoon seasoned rice vinegar*
2 teaspoons Sriracha
Coarse sea salt

Steam beans until tender. Meanwhile, melt and lightly brown butter in large skillet. Whisk in seasoned rice vinegar and Sriracha. Cook for a minute to blend before adding beans. Toss well and server hot with a pinch or two of coarse salt. Mop up any extra butter with a piece of good, chewy bread.

*Seasoned rice vinegar has a touch of sweetness added to it. If you are using unseasoned rice vinegar, add a pinch of sugar.

long benas


instapig

No Instagram images were found.